Shortly after I had installed my Tom Wood front drive shaft, I came across an on-line forum thread that was started by a friend of mine. It dealt with his front CV drive shaft rebuild. Somewhere along the line, the discussion got around to u-joint grease and what was appropriate for the application. I had never given the topic much thought as I have used a synthetic grease (Mobil 1) in my grease gun for years. Some of the comments in the thread left me wondering about proper u-joint lubrication.
I dropped Tom Wood an e-mail to see what his views on the subject might be….after all, Tom should have some insight into this since he makes a living from building drive shafts that are full of u-joints.
Here is part of Tom’s response:
I get asked this question often and the answer has always been that; “I believe a frequent and thorough greasing is more important than the type of grease you use”. This is primarily because, one of the main results of a proper lubrication is a “flushing out” of any contaminates. It seems that a little grease and dirt make an excellent grinding compound. While greasing, if you pump in grease until you see clean grease come out past ALL the seals, you will insure that most of the contaminants will be washed away.
I’ve taken a look at the lubrication recommendations from some Spicer universal joints (greasable and non-greasable) on my shelf and they read as follows:
Spicer Re-Lube Light/Medium Duty…….. “Lithium base greases meeting NLGI Grade 1 or Grade 2 are preferred”….
Spicer Pre -Lube Light/Medium Duty…….. “Do not add lubrication Do not mix bearing caps on journals”…… “Miss-matching of cups on cross will result in improper quantities of lubrication in cups causing premature joint failure. Addition of lubricant may damage bearing* cup seals leading to premature joint failure” * ar (ours�obvious miss-spelling)
The NGLI is the National Grease Lubricating Institute (I’ ll bet it’s a pretty boring place). It is the umbrella organization that sets the standards for the properties of different greases, oils and other lubricants. Again, although I am not an authority on the subject, I do know that the grade will typically refer to the viscosity of the lubrication, with a grade 1 being less viscous than a grade 2. The lithium is the base to which the lubrication is added. In this case I believe that lithium is basically a soap base. There are other bases to which the lubrication can be added, Molybdenum Disulfide for example, which is typically referred to as a “moly” grease. You or your readers can get all the information they need or want about the specific properties of each grade and designation of greases at this web site.
Beyond that there are a few general parameters that I would suggest in selecting the grease. Temperature rating should be at least 300 degrees. This may sound awfully high but it wouldn’t be uncommon for the drive shaft to reach an operating temperature of ~250 degrees and it’s important that the lubrication doesn’t separate from the base and boil off. There is also a load rating to consider. Theoretically at least, if you can prevent metal to metal contact, you will prevent wear. Greases and oils will have what is known as a “Timken Load Rating”. While I’m not qualified to explain all the technical information of a Timken Load Rating, it is basically the rating of the lubricant to withstand certain amounts of pressure before smearing so thin as to allow surface to surface contact. The Timken Load Rating should be sufficient for the intended use. Most greases will probably be adequate with the exception of thin motor assembly grease. The viscosity should be in the range that will allow for a good flow past all the wearing components while servicing. Again, this is for the “flushing out” of the contaminates while servicing. Very high viscosity in the grease may actually be detrimental as higher viscosity greased tend to create more heat than would a more freely flowing grease. Remember to that ultimately, heat is one of the real enemies here. If you run in a lot of water or mud, it may also be good to use a grease that has water resistant characteristics.
First, I want to thank Tom for taking the time to respond to my e-mail. I appreciate the comments and viewpoint from someone who has been in the business for a while.
Armed with some info from Tom, I hit the internet and did some digging around. I found that the “NLGI Grade” that Tom mentioned runs the range from Grade 000 to Grade 6. To give you an idea what this range includes, 000 is semi-fluid (pourable) grease while Grade 6 holds its shape and is too hard to be worked. Grade 2 is the most common grease grade and Grade 1 is slightly softer than Grade 2. If the grease is too stiff, it will may not feed into areas requiring lubrication. If the grease is too fluid, it can leak out. Either situation can result in damage to the components that are depending on proper lubrication, like the needle bearings in your u-joint.
My friend that had started the forum thread was told by the shop he got his parts from that the grease used on the u-joints should be extreme pressure rated. The more I dug around the NLGI web site, the more I realized that Tom’s comment about that place being pretty boring was oh so true. Don’t do a search on extreme pressure, you’ll find more info than a normal person could handle in a life time. Let’s just say that you want a grease that exhibits good extreme pressure qualities….I’m not sure how that is measured just yet….and I’m not going to try to find out either.
So after a bit more poking and prodding with the web browser, I finally surfed over to the Mobil1 web site to see what I could find out about the grease I was using. Over all, I was pleased with the results, based on what I had seen on the web and gotten from Tom’s e-mail. I found the following:
- Mobil1 Synthetic grease is a NLGI #2 high-performance grease made from a synthetic base and lithium thickener.
- It claims to have optimum extreme-pressure properties and excellent resistance to water washout.
- Operating range is -35* F. to 450* F. (that exceeds Tom’s requirement of 300 degrees)
- Good shock loading (sounds like something we want for the needle bearings)
- Excellent resistance to rust and corrosion
- It is listed as being particularly suited for disc brake wheel bearings, ball and steering joints, and universal joints and provides outstanding bearing protection under heavy loads at any highway speed
I’ve no doubt that if you go to other lubrication manufacturer’s web sites, you will find similar data stating that their products are good.
I know a little more about grease now then I did earlier today. According to Mobil1’s web site, the grease I am using should work well for everything I use it for. And I plan on following Tom’s suggestion about properly “flushing out” the contaminates that may get into the components.
Some night, if you find yourself at the edge, and counting sheep is looming on the horizon as the only way you may fall asleep, try surfing on over to the NLGI web site and so a search on extreme pressure. If you make it through the first white paper without falling asleep, maybe you should consult the services of your family doctor……I think you may be suffering from a severe sleep disorder.
Warn Hub Conversion
A couple of things in the spring of 2002 made up my mind about a Warn hub conversion. One was the dent I put in the front drive shaft. It was not big enough to cause a problem until I hit freeway speeds. Had I had the Warn hubs then, I would never have bothered to have the front drive shaft re-tubed (aside from the poor job that was done on it….but that is another story for another time).
I ordered the kit from 4 Wheeler’s Supply here in Phoenix. Barry hooked me up with a good price on the 5 on 4.5″ kit and I picked up a spare hublock at the same time. The kit comes with hardened outer axle shafts and you can use your existing factory inners or Warn’s chrome/nickel inner shafts. Another Jeeper in California was replacing his D30 and I picked up a pair of used Warn inner shafts for a reasonable enough price. The last major item needed was a good pair of full-cast rotors. I had the factory composite rotors on the TJ and these do not work for the conversion. Blaine picked up a pair of Autospecialty Premiums AR8722 in CA and had the rotor center holes machined to spec and then sent them my way.
Note: New full-cast rotors from a 1990 or newer Wrangler (ITT #65225 or equivalent) must be used with the hub conversion. These rotors have a .25″ thick mounting flange. Do NOT use the factory style “composite” rotor as it only has a .125″ thick flange. The rotor pilot hole must be machine to a diameter of 3.575″ +/- .015″ to fit the wheel hub. Some wheels may not fit over the hublock body as required. Wheel center hole must be at least 2.78″ in diameter. Be sure to check your wheels before proceeding.
Note: This was posted on-line by T.Dome, a friend of mine from Washington…..regarding the full-cast rotors. He said:
“When I bought my hub kit a year or two ago it came with machined rotors that the business assured me would be just fine. I had reason to trust these people and did. The hubs were composite. I argued their safety and how Warn says not to use composite rotors. They told me: “The only reason warn doesn’t want you to use composite rotors is they tear easily during machining.” That was a direct quote.
I also brought up the issue of thickness of the flange area of the rotor and they assured me that there was no issue. I settled for their word. So during my yearly intense pre-maintenance kick, I decided to go to cast this year, re-pack and inspect the bearings, and check torque and tightness on everything under the jeep. I pressed the studs out of the hub and old rotor and inspected the flange and it was actually wavy, bent around the inner rim. I don’t know if it was from pressing out the studs or if it was done by the business who pressed them in for me the first time or if it was done by wheeling and driving.
The point I am trying to make is don’t let anyone tell you it is OK to use stock TJ composite rotors for your warn 5 on 4.5 kit. The flange is way too flimsy, especially after it has been machined out. Use 1990 and newer YJ rotors.”
That was all I needed to do the conversion. So, with the this out of the way, time to get down to some of the work we did. A big thanks to ScottK for helping with this conversion. I had been helping Scott with his 8.8 rear TJ axle conversion and so he was more than happy to help with this project. He was also interested to see just what was involved as he has been kicking around the idea of doing it on his TJ too.
To get started, I’ve included the parts list from the Warn installation instructions. I’ve also included the exploded parts diagram they have in their documentation. Note that this write-up is not meant to replace any of the information contained in the Warn documentation. Some of things I did may not totally agree with what the install instructions contain. It is your choice as to what you do with the information contained in this write-up.
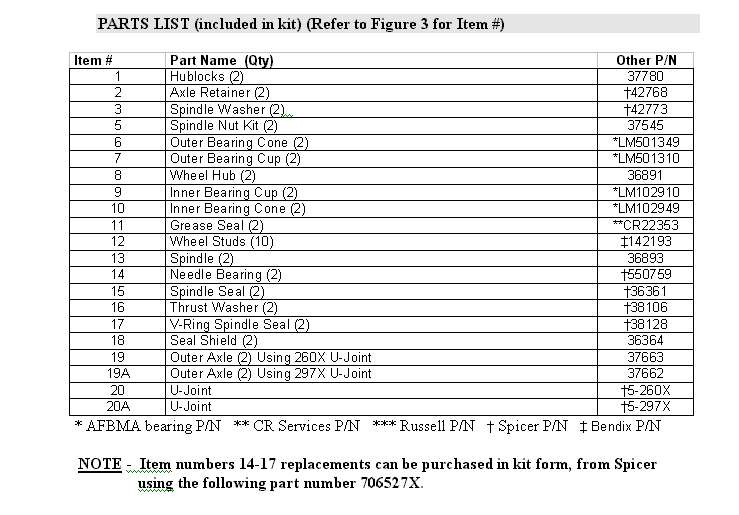
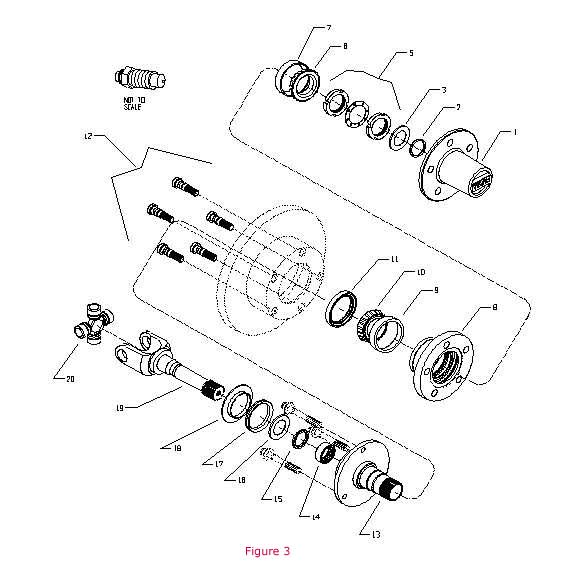 While not the best reproduction, the above parts diagram will be referenced as necessary through out this write-up.
NOTE: KevinN, one of the site’s visitors who has a Warn hub conversion, sent me a copy of the Yukon’s documentation (including their parts list). Warn sold their hub business to Yukon some time ago. Here is the Yukon hub conversion install and parts documentation.
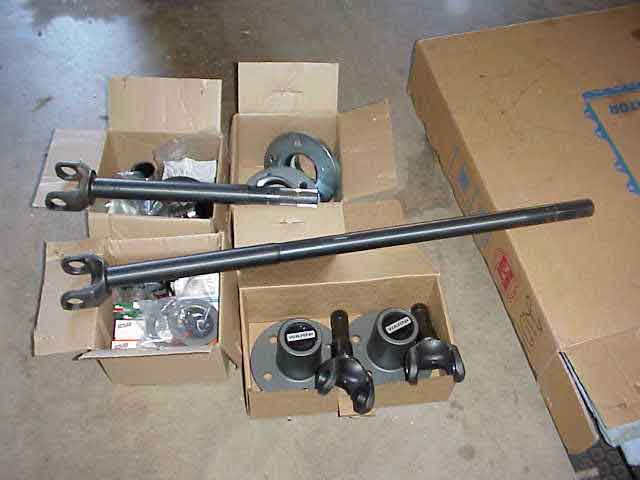
With the Warn parts list in hand, I went through the boxes and made sure everything made it to my garage. I didn’t want to get half way through this and discover I was missing a seal or bearing. We were doing the install on Labor Day which meant there was no last minute run to the 4×4 shop to get a missing part.
NOTE: This is probably a good time to comment about the spindle. There was a point in time when the spindles were not heat treated. Your spindles should be heat treated but if your hub kit had been sitting on a dealer’s shelf for a while, it is possible that you got the old style spindles. You can tell if your spindle is heat treated because the metal has a darkened/dull appearance where it bolts to the steering knuckle. The part that the wheel hub slides onto is more shiny (from the machining process). If your spindle does not appear to be heat treated, contact Warn before going any further.
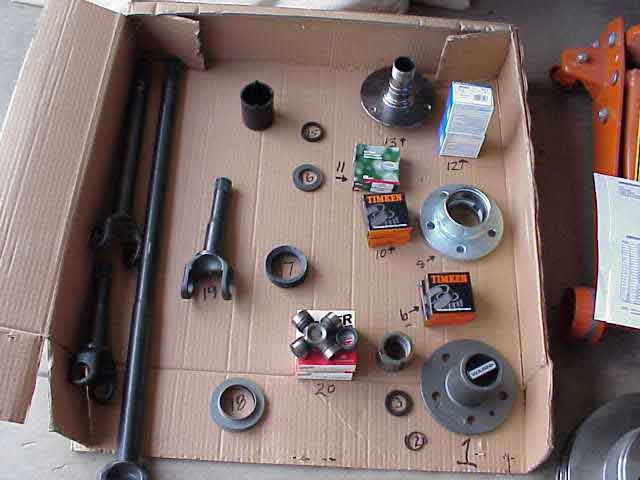
I took an old cardboard box and used it to stage the parts. A black marker was used to mark the parts with their appropriate number as they appeared in the exploded parts diagram. Since the Warn instructions referenced that diagram a fair amount, I figured this would make it nice and easy. I probably didn’t need to do it, but I had a few minutes to kill before Scott showed up. It worked just fine and we didn’t put any of the parts where they did not belong!
Warn Hub Conversion
With the parts inventory out of the way and the parts laid out for easy access, Scott showed up with some 90 weight gear lube spewing out of his 8.8 breather hose. (yet another story for another time).
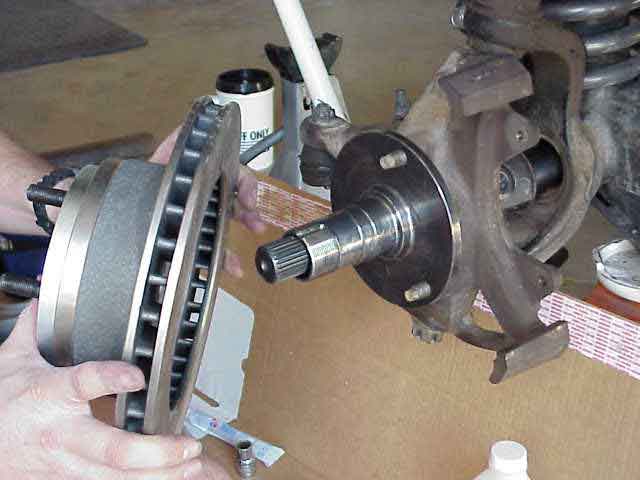
We grabbed the floor jack and slipped it under the driver side lower control arm skid. A jack stand was put in place as well. The tire was removed so we could get to the task at hand, which was to removed the entire axle assembly. I’ve already done a write-up on this so I won’t do the details here. You can see the axle shaft removal here. Since I planned on parting out the factory axles and unit bearings, and since I had Warn inner shafts for this project, I separated the outer shaft from the unit bearing while removing the axle shafts.
With the factory axles and unit bearing out of the way, we turned our attention to assembling the Warn inner and outer shafts. Scott and I have done a number of u-joints during our years of 4 wheelin’. Both of us have replaced the u-joints in a CV drive shaft and have done a couple of D30 axle assemblies also. Let me say that never before have I had such a time putting a u-joint into a pair of axle shaft yokes. Blaine warned me that the Warn yokes have a bit tighter tolerances.
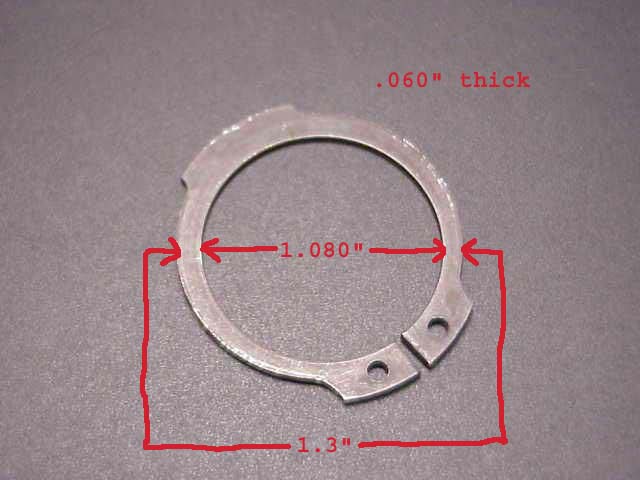
I also opted to use full circle retaining rings to hold the bearing caps in place instead of the standard “C” clips that come with the Spicer 5-760x u-joints that are supplied by Warn. Warn does not specify that the clips should be and I am not aware of Spicer doing it either. Blaine had found some of these clips and was good enough to send a few of these for me to use. I’ve included the dimensions of the clips so you if you decide to go this route (and I suggest you do), you will know what size you are looking for.
I am still trying to determine if I like the new u-joint design. I was glad to see that the needle bearings are a bit bigger….I always have better luck keeping them all standing straight up when putting the end caps in the yokes. On the other hand, I am not impressed with the end cap grease seals. I am use to being able to push the u-joint completely through the yoke while installing the u-joint. These seals appear to have a metal component in them which do not like to clear the yoke very well. If you are not careful, you can damage the seal (usually by putting a little crimp in it). Scott commented that although he recently installed a pair of the 5-760x u-joints, his were not like mine. Perhaps Spicer has made some production line changes. I hope mine were replaced by the style that Scott used. He told me he did not have this kind of seal nor the problem that came with it.
With the inner and outer axle shafts now connected by a fresh new 5-760x u-joint, I put a spot of grease near the spline end of the shaft (where it passes through the oil seal in the diff housing). The axle shaft assembly was now slid into the differential, leaving the outer shaft sticking out of the knuckle.
Next, we gently tapped the seal shield (part #18) into place on the outer shaft. Sorry that I did not get a picture of that by itself, but you can see it in the following photo. We used a small brass hammer to gently tap the seal shield into place. I was surprise at how snug the fit was.
Once the shield was in place, we put a bit of grease on axle shaft where the inner seal rides (near the differential end of the inner shaft) and CAREFULLY slid the inner and outer axle shaft into the tube. I say carefully because you don’t want the spline end of the inner shaft to pick up dirt and such when you are slipping it into the axle tube. I support the shaft right where it goes into the tube and then carefully leverage the other end while feeding it into the axle tube. With patience, you can slide it all the way in and still keep your splines and seal area free from dirt.
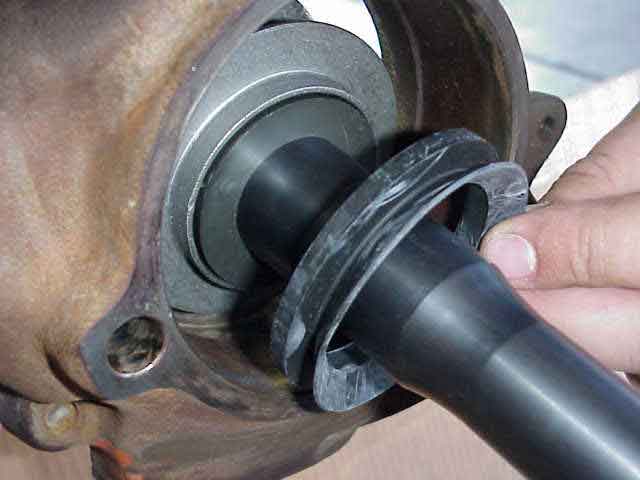
You can see the seal shield in this photo. The thrust washer (part #16) has also been put into place, chamfer side towards the yoke. Scott has his fingers on the V-ring spindle seal (part #17) and is just about ready to put it up onto the seal shield lip. As you can see, the thick flat side goes towards the yoke.
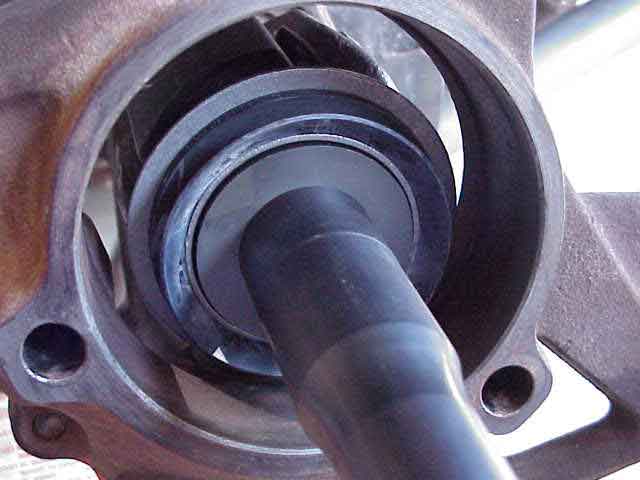
Here is the everything, up to this point, properly put into its place. The V-ring spindle seal has been pushed up onto the seal shield. I put a small amount of grease on the seal surface where it will contact the spindle once it has been slid into place.
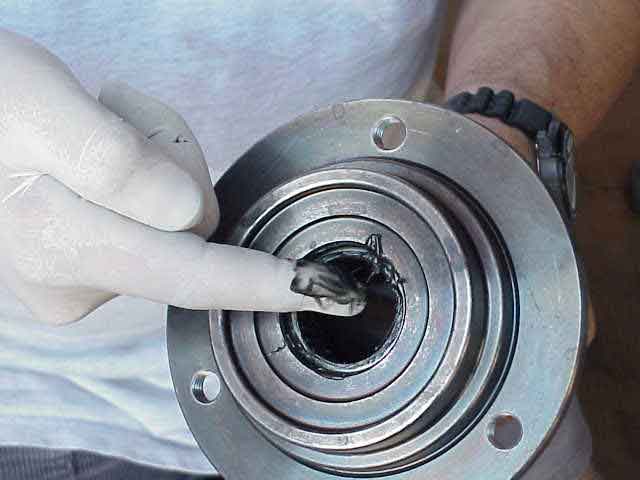
With a laytex glove on, I opened the container of wheel bearing grease and started in on the messy (but easy) part of the job. Warn shipped the spindle (part #13) with the needle bearing (part #16) installed. I took several minutes and worked some grease into the needle bearing.
Warn Hub Conversion
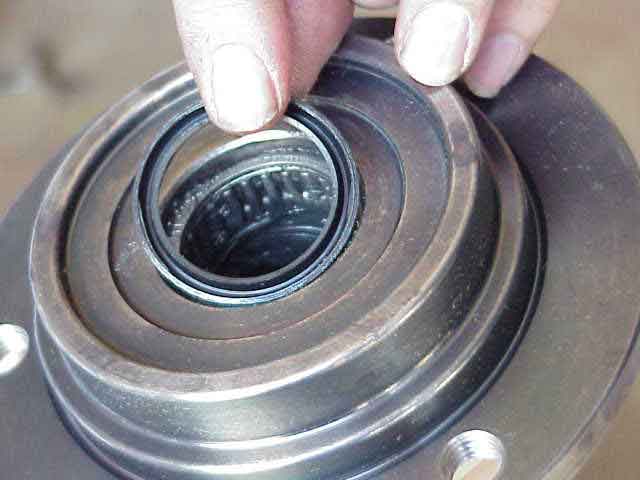
With the needle bearing greased and ready to go, the spindle seal (part #15) is put into position. Note that the seal is positioned so that the cup side (open side of the seal) is facing away from the needle bearing, as shown in the above picture.

I put a little bit of grease on the outer shaft where the spindle seal would contact it and slid the spindle onto the outer shaft. Keep the shaft centered in the spindle as you carefully slide it into place.
With the spindle in place, align the three holes and install the 13 mm spindle bolts that were removed earlier. These bolts are tightened to 75 ft. lbs. At this point, you are darn near done! Not to much more and you will have this side finished.
Take a break from all of this grease and seal stuff and lets press the disc brake rotor and wheel hub (part #8) together. Warn supplies new wheel studs (part #15) with the hub kit. We used my recently acquired hydraulic press to push the studs into place. Be sure the studs come in full contact with the wheel hub surface.
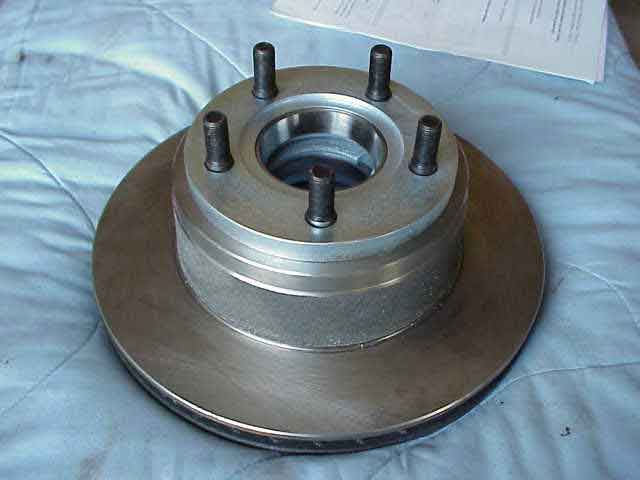
Here is what it looks like with the studs holding everything together. I also should mention that Warn also ships the wheel hub with the inner bearing cup (part #9) and the outer bearing cup (part #7) already pressed into place. (I think that was very nice of them!) If you are wondering why the rotor is sitting on a quilt…well, it is an old quilt that sees lots of use in the garage. When you fold it in half a few times, it makes for a great knee pad while you are working (on your knees of course).
Warn Hub Conversion
Back on with a clean pair of laytex gloves. Next, I packed the groove, that sits between the inner and outer bearing cups, with wheel bearing grease. It takes a goodly amount to fill up that void.
Now, take the inner bearing cone (part #9) , which is usually referred to as the inner bearing, pack it with grease. Do a good job….these little guys is what will keep your front hubs turning and turning for a LONG, LONG time (we hope). The gaps between each of the rollers should be packed well with grease. They make relatively inexpensive bearing packers but I prefer to do it by hand. Hey, with the disposable gloves, it really only looks like it is messy!
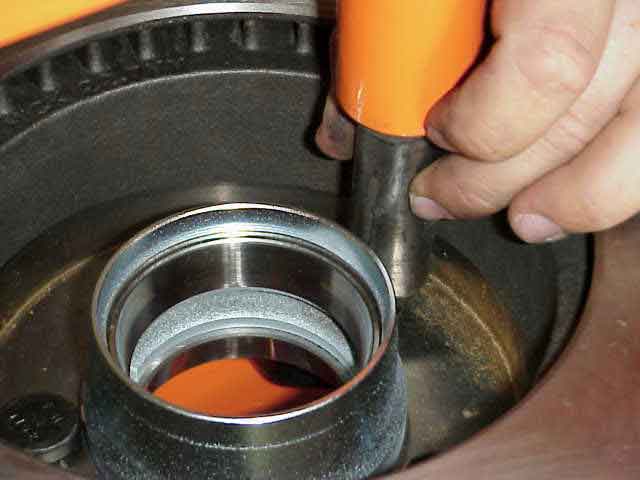
Put the inner bearing in the wheel hub. Fill the cavity of the grease seal (part #9) with grease and set it in place on top of the inner bearing.
We used a bearing cone from a D44 rear axle shaft (you do have some of those laying around, right, from your last D44 rear shaft bearing replacement?) to help press the seal into place. I centered the cone on top of the seal and held it firmly in place with both thumbs while Scott gently tapped around its edge with a small ball peen hammer. He only managed to hit my thumb one time while seating the seal (I guess I should consider myself lucky!)
Next, pack the outer bearing cone (part #6) with grease just as you did the inner bearing. Again, make sure all of the voids between each roller are completely filled with the grease. Place the outer bearing into the wheel hub. Be careful when picking the wheel hub up since there is nothing but a bit of grease keeping that bearing in place until you put on the spindle nut.
Apply a thin film of grease on the spindle shaft. Carefully slide the wheel hub onto the spindle shank. Keep your thumbs over the outer bearing so it does not pop out onto the floor. By the way, I’ll mention that on these kind of jobs, I usually lay down a piece of cardboard under the work area. That way, when the bearing does pop off and drop (to the cardboard), it doesn’t end up with dirt and other garage floor stuff stuck in the grease.

OK….looking good so far….you are almost done with this one. All you have to do is tighten up the spindle nuts and call it good! Oh yeah….then you have to go do the other side (I almost forgot).
Warn Hub Conversion
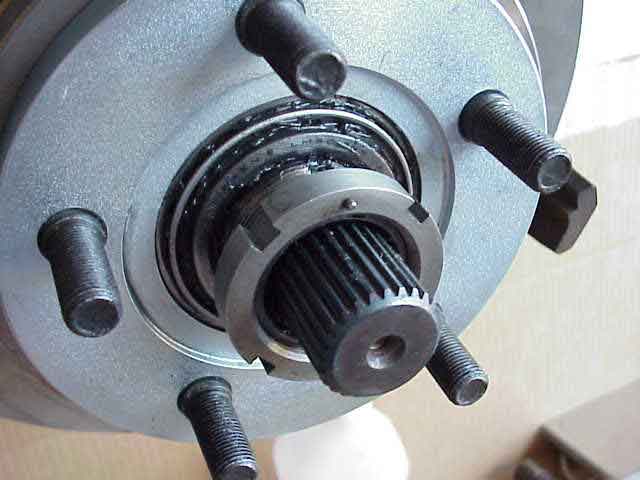
Next, thread the inner nut (part #5) onto the wheel hub. Note that this nut (one of three pieces) has the little round pin on it (shown at the 12 o’clock position) in the above picture.
Now….this is where some folks, myself included, don’t follow the Warn install instructions. I consulted some friends that run this hub kit on their TJ D-30 to see how they did it. I am not telling you that the Warn method is wrong. I am telling you I did not follow the torque specs for the spindle nuts as outlined in the Warn installation instructions.
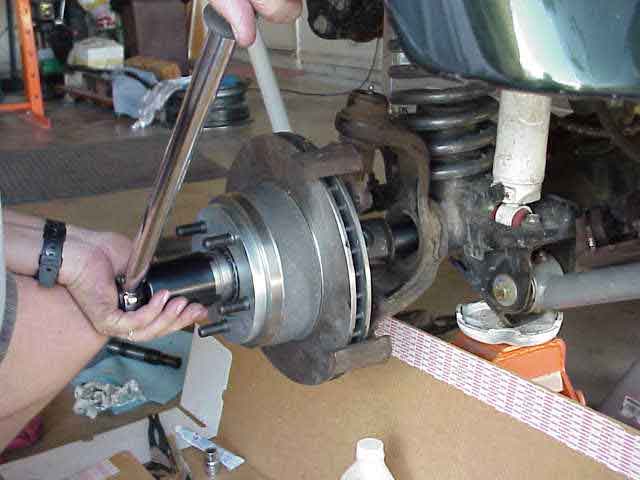
Using an inch pound wrench, tighten the inner nut (with the D44 spindle wrench) to about 55 in lbs. Just before you begin to tighten the nut (and we aren’t talking very much torque here), spin the rotor by hand to get a feel of how much resistance there is. It should be spinning quite freely right now. Tighten the nut while continuing to spin the rotor back and forth. Moving it back and forth also helps seat the bearings too (as the instructions state). You will notice that there is a bit more resistance than there was when you started.
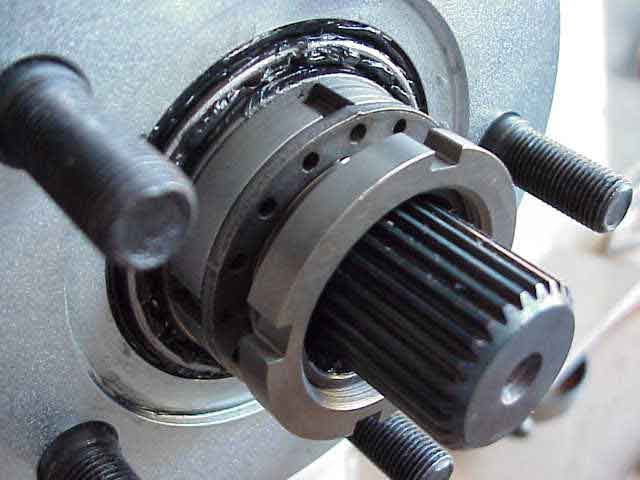
Slip the lock washer (part #5) onto the spindle. If the hole does not line up correctly, flip the lock washer over. The holes in it are not symmetrical to the tang so it will probably fit when you flip it over. If it does not, then tighten the inner nut ever so slightly until the lock washer slips into place on the inner nut.
Thread the outer nut onto the spindle and torque it to 150 ft. lbs. If you rotate the rotor back and forth, you will notice that it tightened up just a bit more. The rotor should still be easy to turn by hand and will probably continue to rotate about a quarter or third of a revolution when you give it a spin and let go. Now….like I said, this is how I did mine (more or less). Actually, I tightened the inner nut by hand (just turned the big old D44 spindle nut wrench by hand) until it was snug. After I put about 10 miles on the Jeep, I shall pull the tire and check it and see how close I was by checking it with the inch pound wrench.
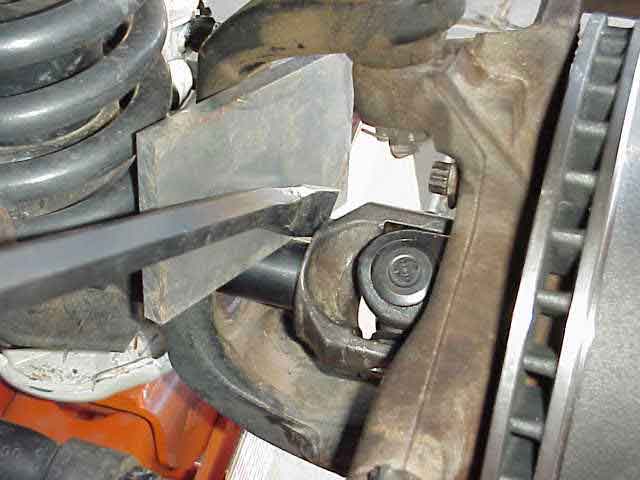
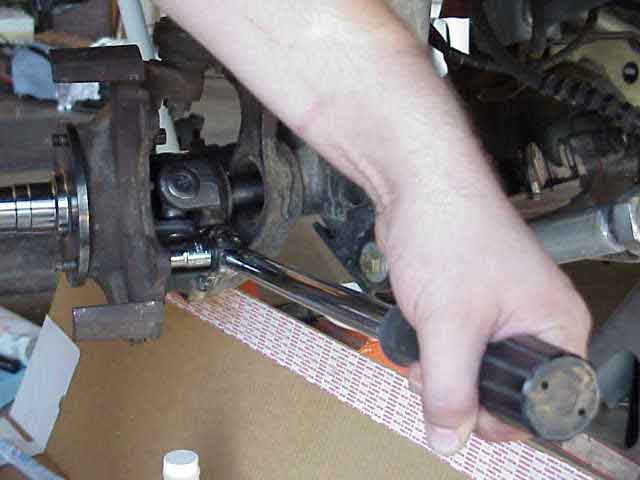
Next, get yourself a small pry bar or something you can pry with and place it on the back side of the inner shaft yoke. Apply a bit of pressure. All you are trying to do is to push the axle shaft out towards the wheel hub a tiny bit.
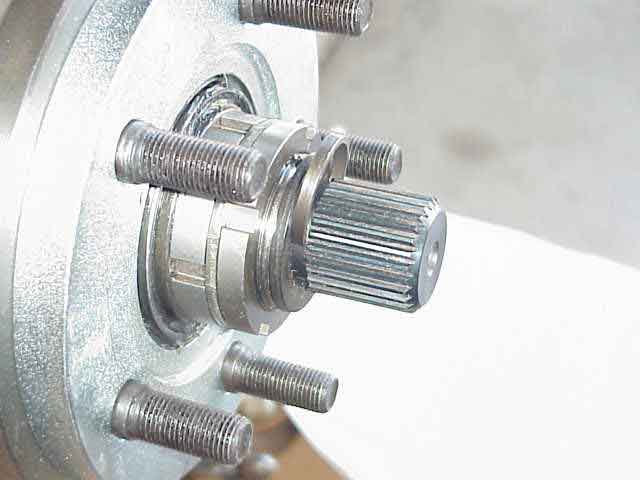
By pushing on the yoke a tiny bit, you will expose the recessed area on the inboard side of the outer shaft splines. Slip the splined washer (part #3) onto the axle shaft. Place the c-clip (part #2) on the inboard side of the splines and snap it into place, as shown in the above picture.
Apply some anti-seize compound to the o-ring inside of the hublock (NOT GREASE) and slip it onto the spindle while lining up the holes for the lug nut. Install your brake caliper onto the bracket and replace the two 13mm caliper mounting bolts. Torque the mounting bolts to 11 ft. lbs. Mount the tires/wheel onto your shiny new hub conversion and torque the lug nuts to 100 ft. lbs. Be sure you check them again in about 50 miles.
That is it! Repeat this process on the passenger side and you are done. I look forward to NOT having my drive shaft spinning all day long as I drive down the freeway or around town. Talk about a waste of all those u-joints spinning round and round (not to mention the ARB locker).
Good luck on your conversion and I hope it goes well for you. (be warned that putting those nice new u-joints in those Warn shafts will try your patience!) LOL
Remember to TREADLightly!
Late Note: If you look closely, you will see the dust shield (that I forgot to install) laying on the floor jack. To this day, both dust shields are stored on a garage shelf. What can I say?
Extended Thread Lug Nuts
One thing I noticed after installing the Warn hub conversion was the length of the wheel studs. The mounting surface on my aluminum wheels are thicker than steel wheels. As such, I didn’t have as much thread engagement on the wheel studs as I would have liked. I spoke to Rick, my local tire guy at Discount Tire, and he ordered some ET (extended thread) style lug nuts for me.
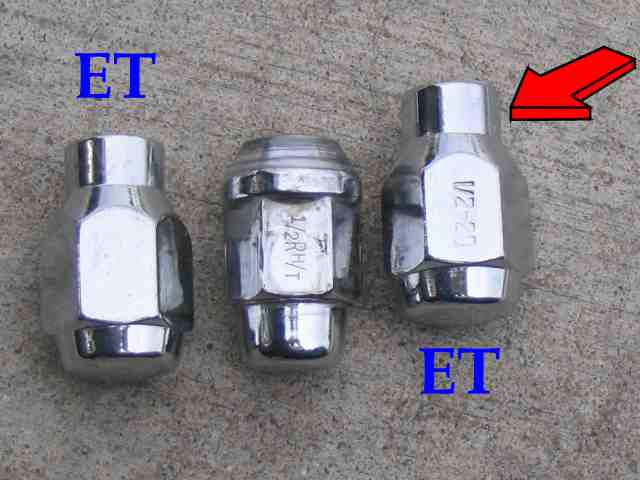
The middle lug nut in the picture is the lug nut I had been using on my wheels. As you can see, the overall length of the ET lug nut is the same as the regular lug nut. The arrow points to the threaded section of the lug nut that allows it to engage more of the threads on the wheel stud. It has an extended neck that allows more thread engagement while allowing the tapered shoulder to properly engage the wheel.
Before I installed the new lug nuts, I removed one of the wheels from the vehicle. I then inserted the ET lug into one of the holes in the wheel and checked to see that it did NOT extend through the wheel and out the other side. I was OK….mine were about 1/16″ short of coming out the other side. If they do extended through, do NOT use them as you will not be able to properly tighten your lug nuts to secure the wheel to the axle.
These ET lug nuts also solved the same problem I was having on my rear axle since converting to rear disc brakes.
Update 08/06/2006:
I’ve been asked on and off for a source or part numbers for the above ET lug nuts. I got RickB, my tire guy, to give me a couple of links. Links being links, I’ve no idea how long these will stay valid (some companies change web contents fairly often). But the primary site name will be around for a long time so you still can look them up at their home page and then search for the ET lug nuts on their site. Here are two links RickB sent me:
http://www.tradeunion.com/catalog.html
Benefits of Lock Out Hubs
It is not uncommon to find questions on the various on-line forums asking about the benefits of a Warn hub conversion. It is certainly a valid question since the cost of the conversion is not trivial. Here are my thoughts on the various benefits (or lack there of) that you will see.
Mileage – Sorry, you are not going to get better gas mileage because of your conversion. Logic says that if you don’t have to spin the front axle shafts, differential, and front drive shaft, you should be able to increase your gas mileage. I agree that logically this is correct, but in reality, you are pushing a vehicle shaped like poorly designed aerodynamic brick through the air at 65 MPH. Your vehicle has a flat vertical grill and a nearly vertical windshield. Any potential gas mileage improvement is negated by the shape of the TJ and the wind drag it creates. I personally saw zero change in my mileage. You could do much better in the gas mileage department by not accelerating so fast or shifting at a lower engine RPM.
Maintenance – The factory unit bearings, commonly called hubs, on the TJ are not serviceable. When they go bad, you simply replace them with a new one. The TJ has been on the market long enough that folks are seeing hub failures as a maintenance replacement expense. I’m not saying they will shortly fail again after you replace one, its just that many folks with some higher mileage or hard vehicle use (rocks, mud, etc.) are seeing it come up. The price of a new unit bearing varies just like most other replacement part and depends on where you shop, etc. $150~$175 each is probably about average. Dealerships are higher priced while a discount parts store is usually the cheapest. Most folks are getting reasonable life from the factory unit bearings. I honestly don’t know how the after market units are doing. Regardless, replacing a pair of them will kill one or two of the anticipated mods you were looking to do next month.
On the flip side of the coin, the replacement price for the bearings in the hub conversion are quite reasonable. The Timken bearings that come in the kit are excellent quality. As I write this, I’m going on year 3 for my hub kit. I’m still running the original set of bearings. Each year, I pull my hubs and hand pack the bearings. This gives me a chance to ensure that all is well inside that easy to ignore hub. I do sacrifice two seals while performing this annual maintenance but I see it as no different than the routine maintenance of the fluids in the tranny, t-case, or differentials…..even though it was not bad, new fluid is added and everything buttoned up until an inspection is needed. When I do finally get around to replacing the Timken bearings, I’ll spend about $20 price for a bearing (each side requires two). That is a significant savings over a single unit bearing replacement, let alone two.
Since we are commenting on maintenance, the Warn hubs provide you with another benefit, that being greatly reduced maintenance for the front drive shaft. The double cardan joint (also called the CV joint) in the front drive shaft is well known for acquiring a problem that is commonly known as “angry sparrows”. The term comes from the chirping noise you hear when the centering ball in the double cardan joint gets a little dry (low on grease)….it sounds like a couple of angry sparrows going after each other. It is usually heard at low speeds and is sometimes temperature sensitive. Taking the drive shaft out and removing all of the u-joints so that they can either be re-greased or replaced with greasable u-joints is the most common cure. Of course, without the Warn hubs, your drive shaft is always spinning, even in 2WD going down the freeway. With the Warn hubs, your drive shaft only rotates when you have the hubs locked and that would normally be when you are in 4WD on the trail (or perhaps bad snowy weather on the highway).
Survivability – Maybe I should call this a durability or strength improvement. The hub conversion comes with new outer stub shafts (the small shaft that is fastened through the hub and connects to the axle shaft u-joint). These stub shafts are chromoly and are a good step up from the factory stub shaft. Warn also offers chromoly inner shafts and these are not provided as part of the kit. In my opinion, it is worth the extra expense to include the beefed up inner shafts.
The reason that most stock shafts fail is not due to the u-joint breaking. The broken u-joint is normally the victim and not the cause. As you stress your STOCK axle shafts during normal use, the non-hardened yoke ears (where the u-joint caps are pressed in) begin to slowly distort. As this distortion increases, the caps begin to loosen. You may have heard someone comment about their u-joint caps “spinning” in the yoke ears. People often mark the caps so they can more easily determine when the cap has started to spin…..and knowing this, they can prevent this kind of failure on the trail (assuming they take the necessary steps to replace the axle shaft(s)).
Anyway, back to the STOCK shafts…..we’ve been routinely stressing them on the trail and now the caps are getting a little bit loose in the yoke ears. The clips that hold the u-joint caps in place can only withstand so much when the cap is rotating and flexing back and forth and when the clip lets go on an already loosened cap, the cap gets spit out of the yoke ear. When this happens, the trunion slams against the yoke ear. The u-joint can break at this point and the yoke ear often times breaks off as well. Even if it does not break, the yoke ear will be so badly distorted from the severe impact that it will not be reusable…..but remember that it was already getting distorted which was why the cap got spit out anyway. So….you now must replace the damaged shaft, the u-joint, and perhaps the shaft that was on the other 1/2 of the u-joint. If that shaft survived, it can probably become a trail spare (very used but good enough to get you off the trail and back home).
So what do the Warn shafts get us? The heat treated chromoly shafts have hardened yokes. This means that the stress we’ve been talking about does not distort the yoke ears like it does on the stock shafts. Also, the Warn shaft yokes are relieved so that we can use full circle clips to better retain the caps. In addition to that, Warn machines their yoke ears to a tighter tolerance which means they will retain the caps more tightly than the stock shafts. Yes, that also means that installing the u-joints into the Warn shafts is more of a job because of these tighter tolerances. But the result is an axle shaft that is beefier than the stock shafts. It also means that you may very well break a u-joint and your yoke ears/shafts will survive the episode.
Trip Home – If you don’t trailer your TJ to the trail head, it means you have to drive your rig home (like me) once you finish the trail and put some air back into your tires. What happens if you smack your front drive shaft on the trail and end up with a good sized dent in it…or worse yet, bend it? Yep, you will quickly find it unbalanced once you get your rig up to speed. The vibes can be minor or major….it depends on how bad the damage was. With the hub conversion, you would not even realize there were any vibes since you would have the hubs locked out (in the free wheel position) and your front drive shaft would not be turning.
I’ve had some folks tell me that when this happens, they just unbolt the drive shaft at the front pinion and tie it up out of the way…..so no vibes on the way home. Of course, they still have to do something with it once they get home. This happened to me some time back (pre-Warn hub conversion) and resulted in my spending $100 to have my front drive shaft re-tubed and balanced. The vibrations at highway speed were not so bad that it could not be driven but bad enough that I did not want to let this go unattended and then see those things that fail from drive shaft vibes like a pinion bearing, leaking seal, etc. If I had the Warn hub conversion back then, I would have skipped the drive shaft repair. The slow speeds I do on the trail would not have been an issue for a slightly dented/unbalanced front drive shaft. It would not be spinning fast enough to cause an issue.
Collateral Damage – The failure of one component causes damage to other components, resulting in a much larger repair bill than what the initially failed items costs to replace. This happened to my buddy just this past weekend….and I’ll include some pictures since I helped him repair the damage and snapped a few while we did the work.
The scenario that caused him so much grief…..it was the last obstacle on the trail….trying to get over a ledge…..he hears something bang. Once off the obstacle, a check shows no broken u-joints, other parts, etc. The vehicle drives OK, or at least it seems to, so he airs up the tires and heads for home (about an 80 mile trip)….just like me, he does not trailer his rig.
Once home, he notices a leaking front axle tube (driver’s side)….not good. To make a long story short, he broke a Superior inner axle shaft on the driver’s side. The u-joint/yoke ears were fine….the shaft twisted off at the splines at the differential. Here are a couple of pics.
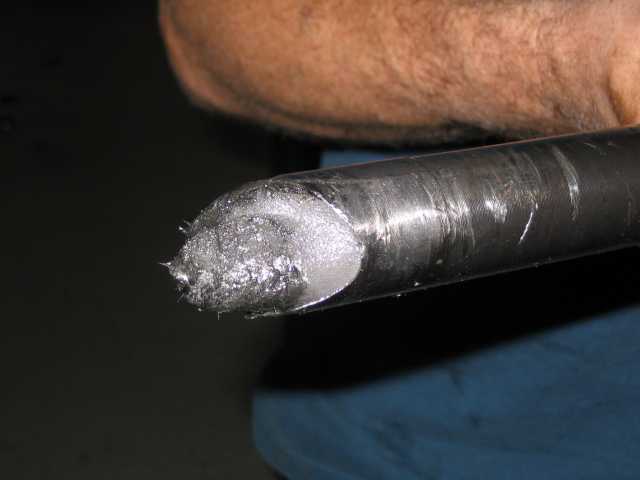
Here is one very broken Superior alloy axle shaft. It carries a 2 year warrantee and so my buddy will be getting this replaced for free (not sure if he has to pay shipping or not).
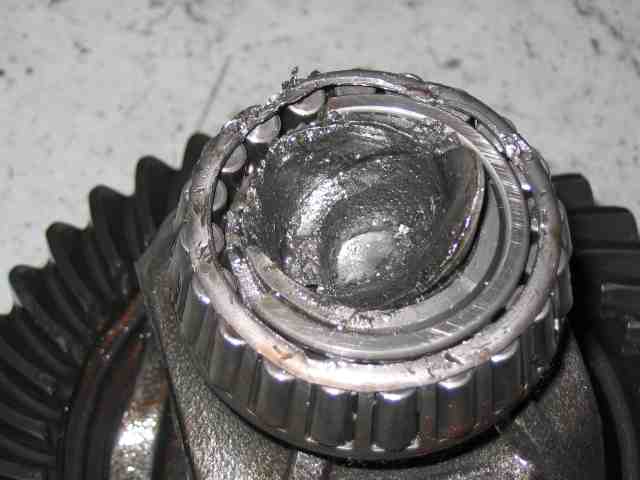
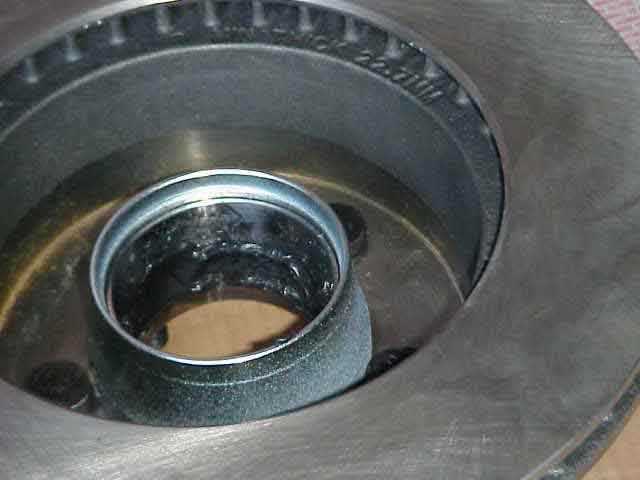
Here is the carrier, with the bearing still pressed onto it, and the broken shaft still in it. The bearing was wasted as you can clearly see. The broken shaft also chewed up the carrier (where the bearing presses on) making its replacement necessary as well.

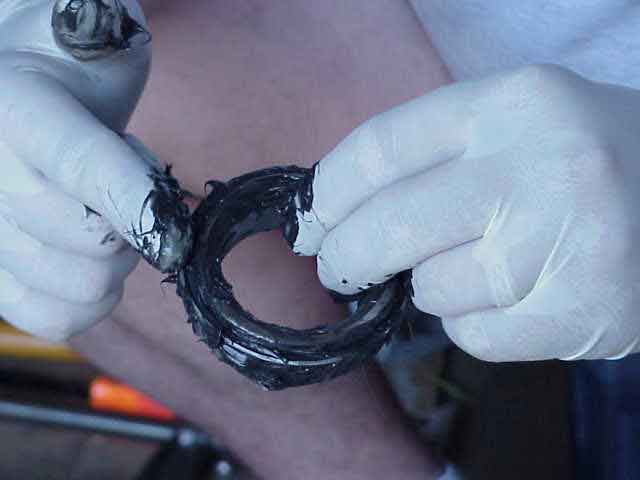
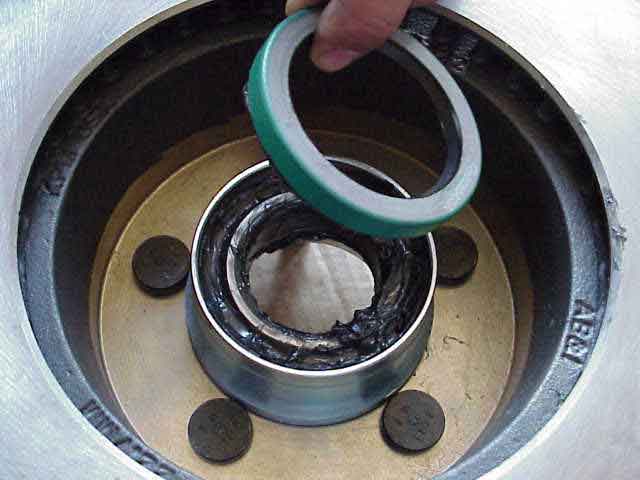
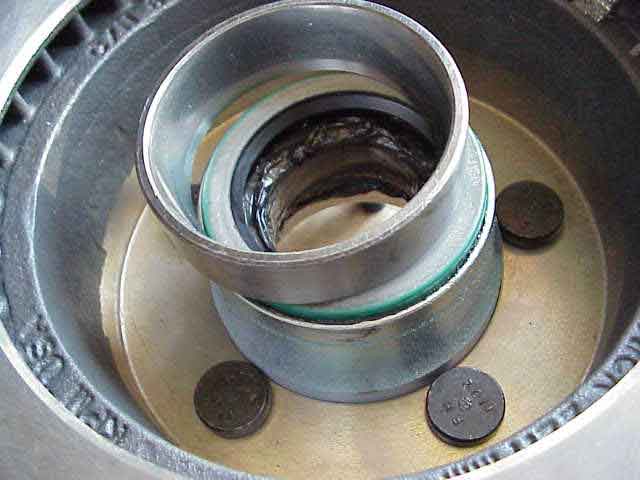
This is where the axle shaft seal would go (right where the tube enters the housing). Aside from the metal ring, that was all we found of the seal (and hence, the leaking diff fluid from the axle tube). As you can see, the end of the broken axle shaft did a pretty good number on this part too. The rough edges were taken down with some emery paper and the outer surface of the new seal was coated with RTV in hopes that it would properly seal against the axle tube.
The pinion shaft was removed and the pinion bearings cleaned and flushed of the metal shavings. It is hoped that these will be OK but that will only be determined after some miles have been put on the rebuilt housing.
We could detect no visible damage to the ring and pinion gears (no big chunks went through them).
When all was said and done, the following items were replaced: axle shaft (warrantee replacement), two carrier bearings, pinion seal, inner shaft seal, and a carrier. The LockRight auto-locker was removed from the damaged carrier, cleaned, and reinstalled in the replacement carrier.
Since a new carrier was installed, the gears had to be setup. My buddy was quite fortunate in that he and I supplied the labor for this front housing rebuild. Most of you probably already know what the expense is for setting up gears. A good friend assisted with the gear backlash, etc. so he was fortunate there as well.
Could all of this been avoided if he had a Warn hub conversion…..more than likely yes. My buddy would have locked out the hubs when he aired up for the drive home. So instead of the axle shaft grinding away on the carrier for those 80 miles, it would have sat motionless during the ride home. Once we had it on the lift and pulled it down, we would have found a broken axle shaft and maybe a damaged inner shaft seal….or maybe the seal would have been OK. The rest of the components should have been OK and certainly no gear setup would have been required.
So add all of those parts up, toss in the typical $300 labor charge for a gear setup, and then see how much closer you just got to the cost of a Warn hub conversion. And don’t forget, this is just one of the benefits of the hub kit.
Trail fix – On a Dana 30 front axle, people that knowingly invest in a Warn hub conversion for the right reasons also realize that they are stacking the deck in their favor when it comes to an easier trail fix. Granted, nothing is bullet proof and there are almost no guarantees in life, but as I said, stacking the deck in your favor can be a good thing when you are doing a trail repair.
Some folks add one more item to the hub conversion project, a pair of super strength u-joints, like those available from CTM Racing Products. A pair of these u-joints, when combined with a set of Warn alloy inner and outer shafts, will usually make the Warn hublock the “fusable link” in the front axle.
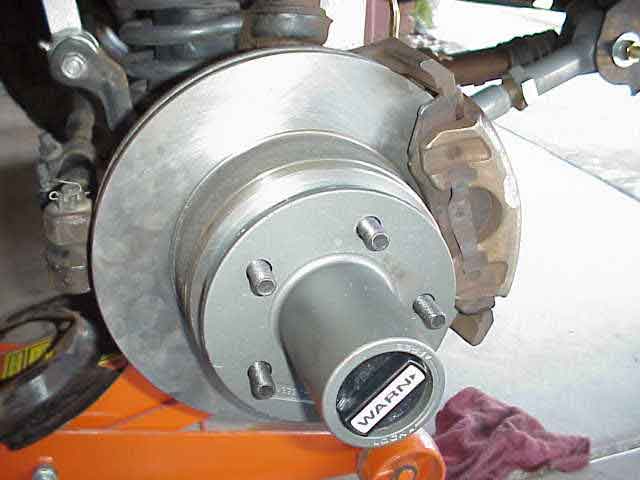
Here is the hublock mounted and ready to go. The only thing left at this point is to slip the wheel into place and tighten the 5 lug nuts. So….how much easier could a trail fix be? We stack the deck in favor of the hublock blowing out….and if it does, we simply pull the tire, slide the hublock off of the wheel studs, slide the new one on, and remount the tire. Takes about 5 minutes (without impact tools). Warn offers hub fuses in their Premium locking hubs (5 x 5.5″ version) but these are not available for the smaller hub conversion kit. So….we build the heck out of the rest of the axle components and then hope the hublock blows first.
Well, that is about most of my comments as to the benefits of running the Warn hub conversion. As I said earlier, nothing is guaranteed and nothing is bullet proof. But that is why we still take spares to the trails. It is my intention to do repairs in the convenience of my garage/drive way and wheel while I am on the trail. Reduced maintenance costs (expensive unit bearings) and the ability to tear down and inspect as necessary also sits a lot better with my method of wrenching and routine maintenance.
What ever you decide on, I wish you the best.
….and remember to TREADLightly!