I got my first ham radio license when I was in 10th grade (which was a few class reunions ago to say the least). I spent 8 years in the Navy as an electronics technician and did the last 3 1/2 of them teaching communications repair at a Navy “C” school. I am by no means an RF wizard nor an engineer for that matter, but after building my first 2,000 watt HF linear amplifier from scratch, I felt comfortable enough to drop a hand full of ham and CB radios into my Jeeps over the past 19 years. (we won’t count my wife’s vehicles) OK….the secret is out, I’m somewhat of a radio junkie.
So it was on April 1st (yeah, I know, April Fool’s Day) that I received an e-mail from Andrew Youderian atRight Channel Radios, a CB Radio and Antenna Shop. Somewhere along the way, he had surfed into the CB/Ham Radio section of my site and had a couple of questions for me. Fast forward through a bunch of questions and responses, a couple more weeks worth of e-mail exchanges, and here I am doing a product review on their most recent off-road CB radio kit offering.
One of the reasons I agreed to this installation and product review was to help other off-roaders. I get a fair amount of e-mail during any given week and some of it is CB/ham radio in nature. While I’ve tried to cover the various aspects of getting a CB into your vehicle via the write-ups on my site, these still leave the reader with the responsibility of acquiring all of the pieces and parts and assembling them into a working system. I won’t answer an e-mail by recommending the reader stop by their local WalMart and discuss their communications needs with the well informed electronics associate. That just isn’t right when you may be depending on that radio while out on the trail.
Andrew wanted to make a couple of off-road CB radio kits (priced at different levels) available to the Jeep folks (and other off-roaders) and asked me for input based on my radio and wheeling experience. I saw this as a great opportunity to provide my views and comments on the kits in hopes of getting something that really works into your hands and without breaking your budget. In addition to this, the goal was to get you everything needed to have you up and running without your driving around town looking for SWR meters, coax, an antenna, etc.
I told Andrew that I would install the kit and provide an installation write-up to help the folks who haven’t done this before. After all the parts were installed and the antenna was adjusted, I would then provide comments regarding the kits performance. As a result of all of this, I get more a few more write-ups on the site that will hopefully draw in more traffic. Someday, if I decide to offer banner ads on the site, I’ll have a broader content base by which to support them. I also get a chance to spin the knobs on some new radios (hopefully I’ll review more than this one) and see how they all stack up. Hey, I don’t mind a test drive every now and again.
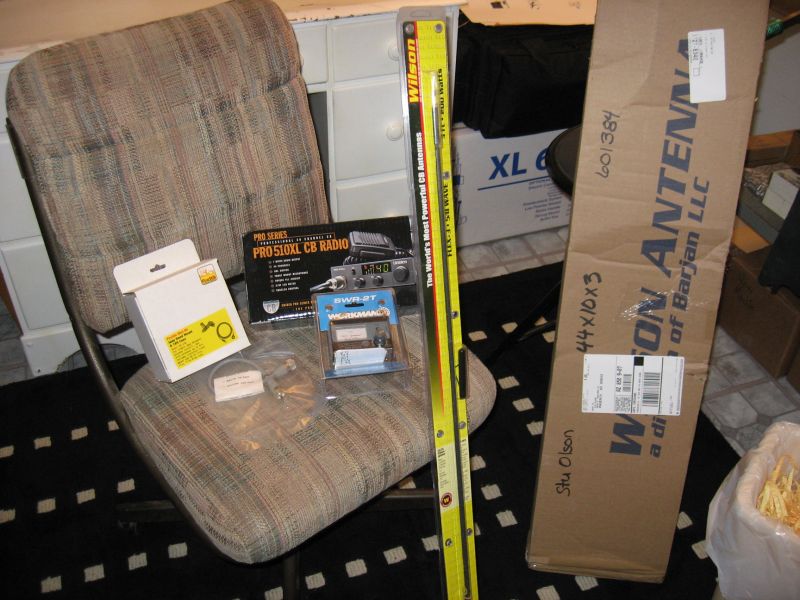
This past Friday, the day before I was scheduled to head out with Donna to run a favorite trail that ends at an old mining town, the kit arrives from Right Channel Radios. Timing is everything and I just didn’t have it going for me this time. I opened the shipping box and did a quick check on the contents to make sure everything arrived safely. It had.
The Uniden kit has everything needed to get you up and running. It includes a Uniden 510XL CB radio, your choice from three available antenna mounting solutions, a 3′ or 4′ Wilson Flex antenna (these are NICE), and a SWR meter with cable to properly adjust your antenna once everything is installed. I’ve seen so many folks just thread an antenna onto a mount and call it good…..and these are the same folks that you can’t hear a hundred yards away on the trail. Glad to see that the Right Channel guys included the SWR meter. Now you don’t have an excuse for an improperly tuned antenna (and you don’t have to pay a CB shop to tune it for you).
Since the off-road kit is comprised of several components, I’ve done write-ups for each part of the kit. This will hopefully make it easier to find exactly what you need or if you are new to the CB game, just start at the beginning and work your way through to the end.
FireStik Jeep Hood Antenna Mount Installation
As I mentioned previously, Right Channel Radios carries a number of Firestik products, and includes three different Firestik mounting options with the Uniden kit. I opted for the Jeep Hood mount as I had not used one of these.
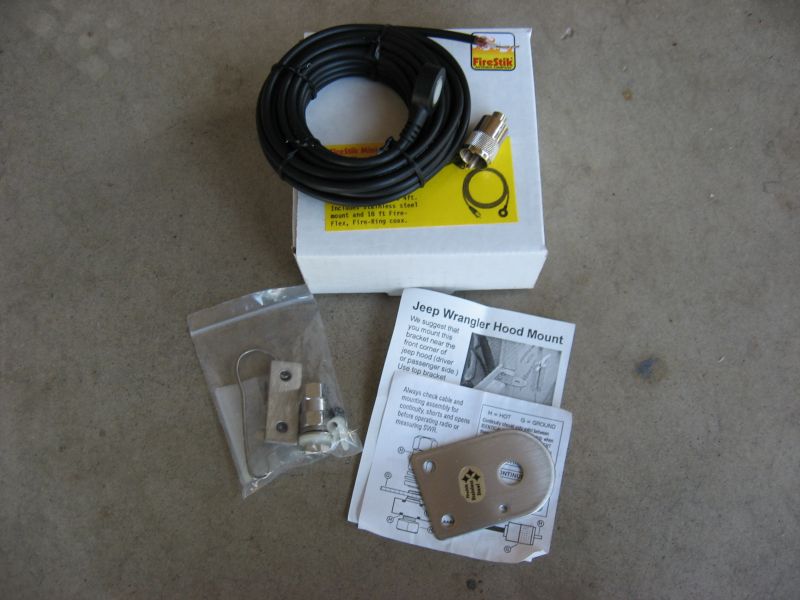
The hood mount, supplied in the off-road kit, is made by FireStik. Since many Jeepers live in the snow belt or other wet climates, you’ll be glad to see that the mounting kit is stainless steel which means it should be up to the task. This mount attaches to the TJ’s front fender lip, under the hood, on either the left or right side of the vehicle. The mount, which includes stainless steel mounting hardware, also includes FireStik coax cable, an RF connector for the coax, and even a microphone hanger (not sure why that was in the antenna mount kit but hey, it might be better than what comes with the radio).
For this mount, the attachment of the coax to the mount is accomplished using FireStik’s FireRing weatherproof connector. This is the first time I’ve used this and I look forward to seeing how it holds up. I have disassembled a number of RF connectors on the trail that were on friend’s TJs. Moisture had gotten into the base of the mount where the coax connector was attached and it literally corroded the interior of the connector. This FireRing configuration doesn’t look like it will be affected in the same fashion.
OK….time to open the hood and figure out where the mount is going.
Before I picked up the drill to make some holes, I stopped by the Right Channel Radio site to see if there was any more info concerning the mount I had selected. I checked out the supplied install photos RCR had displayed and saw how the finished product was suppose to look (hey, that is half the battle, right?). I followed the supplied link to the FireStik site and looked for more info on the Jeep hood mount. While not applicable to my install, I believe a note they provided is certainly worth sharing…..they said:
Note: The rearward part of the fender on newer Jeeps does not have the same support that was found in earlier models. On these vehicles we recommend that the bracket be mounted at least 8-inches (20cm) forward of the rear edge of the fender where it has sufficient support. If this is not followed, or if the rear part of the fender is not given additional support, the fender, dependent upon the antenna size, will flex from any whipping action of the antenna. See the revised installation pictures by clicking on the link in the first paragraph.
So with an idea of where the mount was going, it was time to make a couple of holes. Using the mount as a template, I positioned the mount on the fender and center punched one of the holes. The 2nd one would get punched once the first was drilled and a bolt put in it to ensure proper spacing.
Note: The edge of the mount that goes against the lip on the fender is cut at a slight angle to take into account the curvature of the fender. Position the mount such that it extends perpendicular from the TJ’s fender panel. Positioning the mount the other way makes it appear as though you mounted it crooked (which it would be).
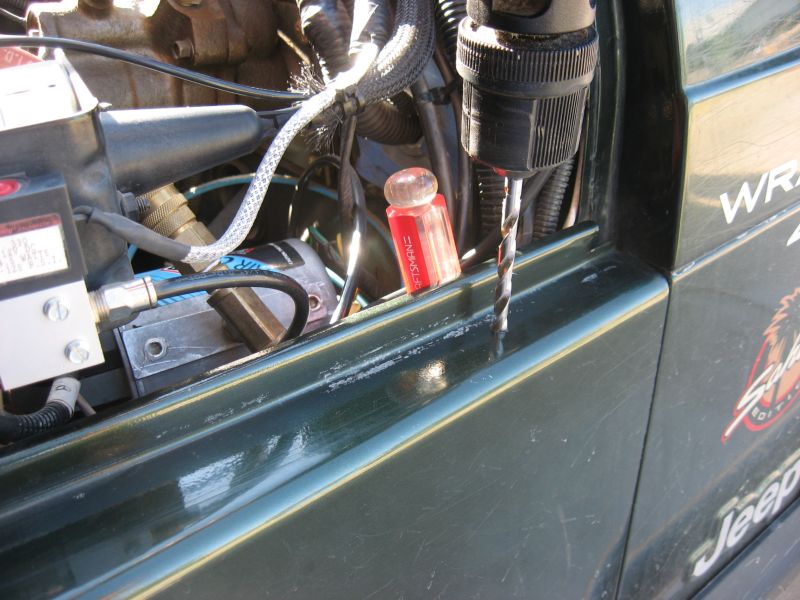
Why the screwdriver? Because before you drill a hole, you always check to see if there is anything on the opposite side that won’t appreciate your putting a drill bit through it. In my case, I had a wire bundle tucked up under that spot. I pushed the screw driver in between the body and the wire bundle which made a clear zone for the drill bit.
As is always the case when making holes, measure twice, drill once.

I used a 1/8″ drill bit to drill a pilot hole and then finished it with a 1/4″ bit. With a mounting bolt dropped into the hole, I was pretty much guaranteed properly placement for the 2nd hole when the center punch marked the spot.
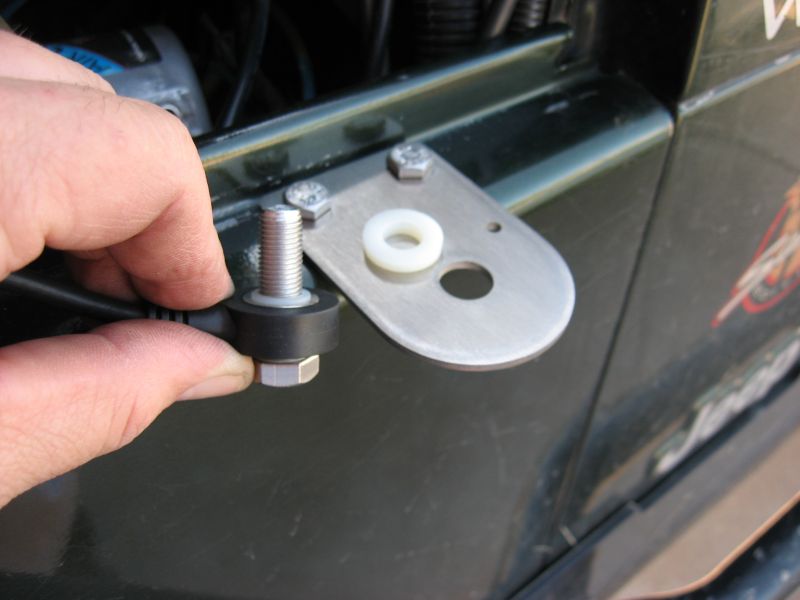
I was glad to see that the mount included a backing plate (also made from stainless steel) to help spread the load. I made a mistake many years ago by not using a backing plate when I was doing a mount and it resulted in some slight cracking of the metal. Luckily, I caught it before it became an issue.
After the 2nd hole was drilled, I positioned the backing plate under the fender lip, slipped a lock washer over the bolt, and threaded on a nut…..repeating that for the 2nd bolt was easier. A slight grunt on the wrenches and the bolts were secure.

FireStik made use of the hood/fender gap that exists on a TJ when they determined the mount’s position on the vehicle. I noticed a slight amount of contact of the hood on the bolt heads when I closed the hood and latched it into place. Will this cause a problem? I don’t see that it will. It causes a tiny bit of deflection of the hood and that is about it. A lower profile bolt head might work better. A button head bolt that uses an Allen wrench might have been a better choice. ACE hardware most likely has them (they have them in non-stainless for sure as I’ve purchased them before) and if this is an issue for you, check out your options at ACE. As I said, I didn’t see it as being enough of an issue to worry about…..but I felt it needed to be brought up none the less.
FireStik Jeep Hood Antenna Mount Installation

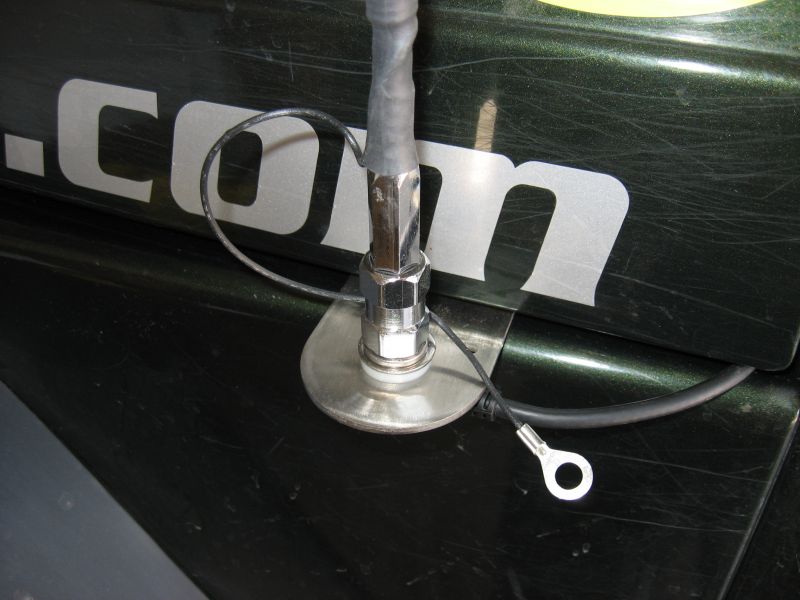
With the mount secured to the fender, it was time to attach the coax to the mount. Again, the kit includes stainless steel hardware here too to help fight off corrosion from the elements and salty winter roads.
The FireRing on the end of the coax has a slight shoulder on one side of the white insulating material. This matches the shoulder on the white insulating washer (white ring). When properly assembled, these two shoulders face each other and meet half way through the mounting bracket.
You can see the small shoulder outlined on the antenna mounting stud where it passes through the FireRing connector. This shoulder keeps the bolt from touching the antenna mount and shorting the RF signal to ground. The white insulated washer sitting on the antenna mount has the same small shoulder on it. Be sure to install it correctly.
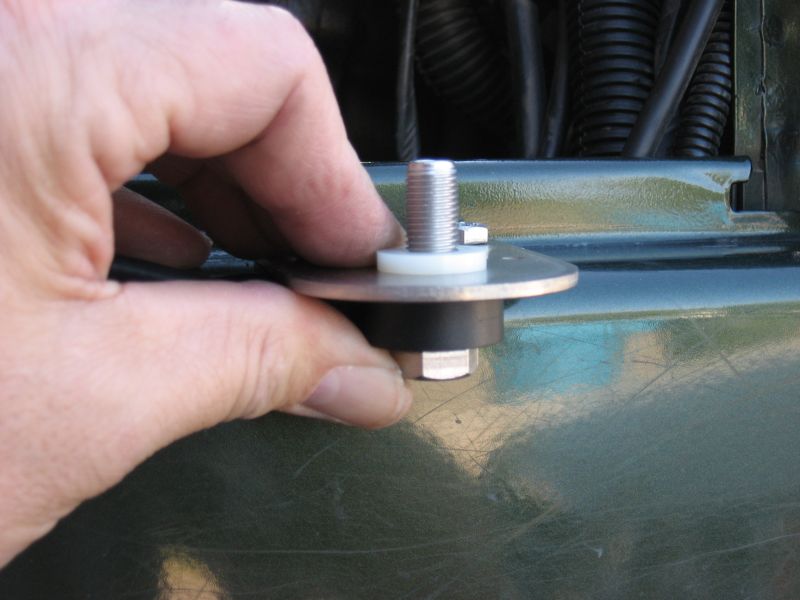
The FireRing is positioned on the bottom of the mount. The insulated shoulder washer (with the shoulder facing down) is slipped over the antenna mounting stud.
After the insulated shoulder washer is in place, the flat washer is placed over the stud followed by the lock washer. To hold everything in place (and provide a place to attach the antenna), the coupling nut is screwed onto the antenna stud. In the above photo, I’ve not yet tightened the nut as I wanted to better show the correct placement of the parts.
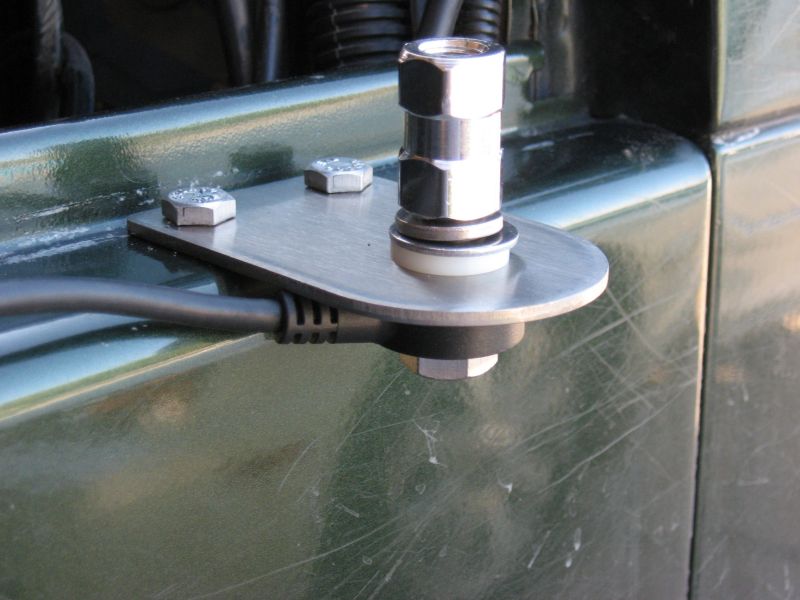
To finish up the antenna mount, I routed the coax through a nice little notch in the body right at the corner of the hood. There is a large oval shaped rubber grommet located above the gas pedal. I cut a small X in the rubber and then pushed the coax cable through the hole and into the cab of the TJ. Over the years, I’ve used the rubber grommet for a lot of cables and it works well to get a wire into or out of the cab.
Uniden Pro 510XL CB Radio Installation
It was time to unpack the radio and find a spot for it in the TJ. I did a quick inventory of the Uniden’s box to ensure everything was there.
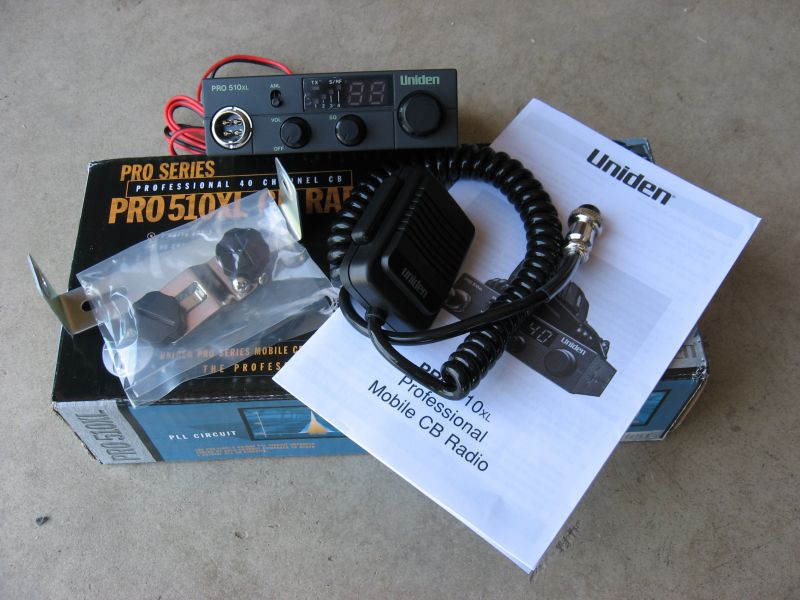
The Uniden Pro 510XL CB radio should support your off-road needs quite well. I’ll get more into the specifics of the radio in the performance review section. But for the installation, it was good to see a radio that was sized appropriately for use in the non-spacious TJ. The dimensions are 4-1/2″W x 6-3/4″D x 1-3/8″H. This makes a a pretty good size for the TJ. Not so small that the internal speaker is worthless and not so big that you can’t find a suitable spot for mounting.
Since this installation was to support a product review, I decided to try and make it as easy as possible. Along with that, I was trying to not leave mounting holes in the center console, dash, etc. Given the low weight of the radio, just 25 ounces, I opted to secure it in place using some strong cable ties and a small plywood mounting plate.
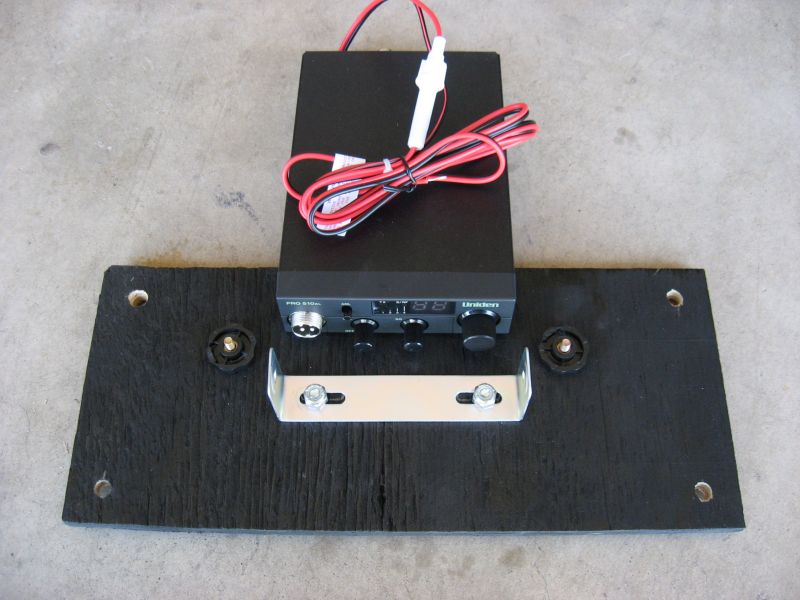
The overhead spreaders on my TBT sports cage are about a foot apart. From a 3/8″ thick piece of scrap plywood, I cut a piece 13″ wide by about half as deep. 3/4″ in from each corner, I drilled a 5/16″ hole that would provide the attachment hole for the cable ties. Two more holes centered on the plywood panel and secured in place with a couple of 1/4″x20 screws with Nyloc nuts finished the radio’s mounting plate.
The plan was to rest the plywood panel on top of the spreader bars and secure the panel in place using the cable ties.

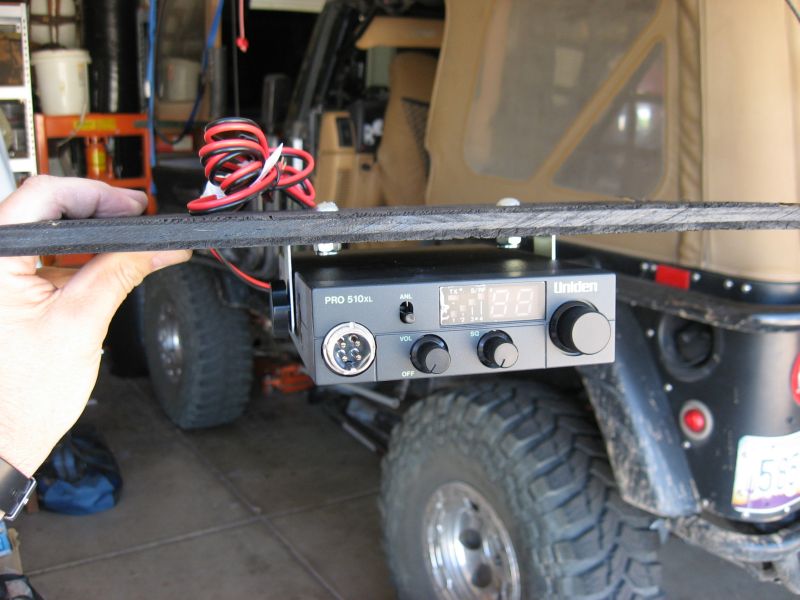
With the radio’s mounting bracket firmly attached to the plywood and the radio mated to the bracket, I slipped the entire thing into position and used four cable ties, one at each corner, to secure the plywood base to the spreader bars. With the padding on the bars, the plywood snuggled down into the dense foam making for a vibration free mounting setup. When this photo was taken, the microphone was just resting on the lip of the spreader bar padding.
While it was my intension to make this a very temporary mounting solution, I see no reason not to use it for a permanent installation. Without the other two radios mounted at the front end of the spreaders, there would be ample room for the plywood panel to be secured there and used for regular CB communications full time.
The Uniden’s power cable was connected to a temporary power tap I have in the rear of the TJ. (A number of various projects that have been installed and removed over the years have required power and so the power connector always remains behind for the next piece of 12 volt equipment.) The Uniden’s manual provides guidance on connecting the radio to vehicle power.
Now that the radio was in position, it was time to attach the RF connector to the antenna coax cable. Having come from a ham radio background for 30 some years, I’ve attached many, many RF connectors to RF transmission line. The PL-259 connector supplied by FireStik in the antenna mount kit wouldn’t have been my first choice, but given that the average off-roader is not an accomplished RF connector kind of person, I believe it makes for a reliable enough connector that just about anyone can install.
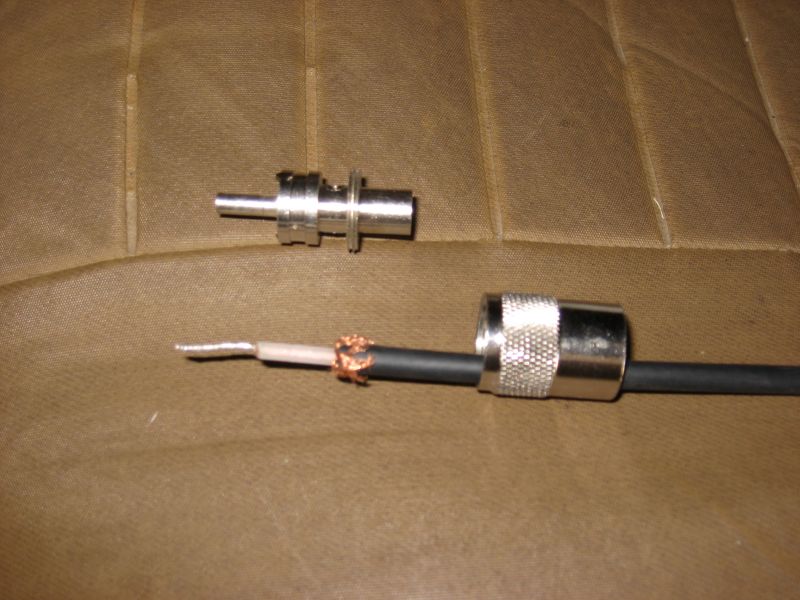
Start by unscrewing the shell from the RF connector body and sliding the shell over the coax cable as shown above. You should have above 1/4″ of copper braid folded back over the coax cable’s black outer covering.
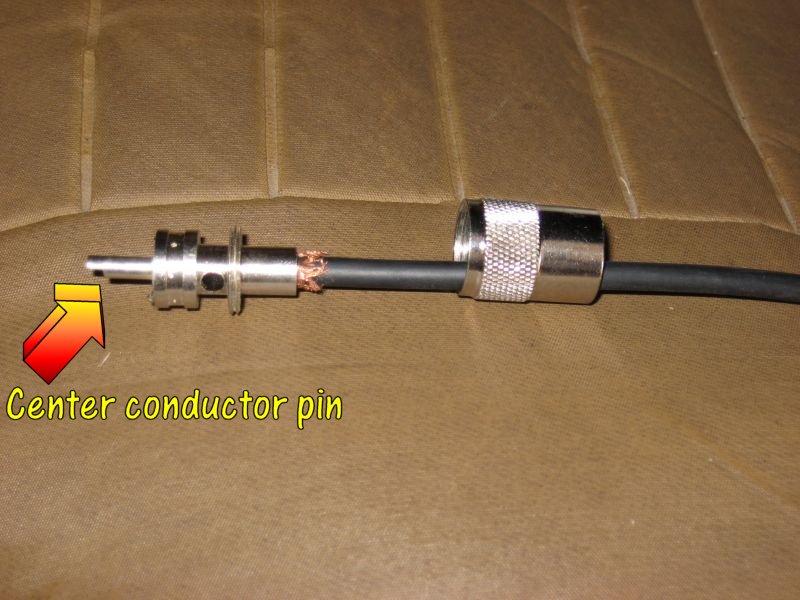
Carefully place the RF connector over the end of the coax cable and ensure the center conductor of the coax cable feeds into the center conductor pin. It is very important that the center conductor of the coax enters the bottom of the center conductor pin. If it does not, carefully remove the RF connector, straighten the cable’s center conductor, and do it again.

Screw the body clockwise until the center conductor is even or slightly protruding from the center conductor pin, as shown above.
Solder the center conductor of the coax cable to the pin using a soldering iron. YOU MUST make this solder connection. Flow the solder evenly (and smoothly) at the end of center conductor pin, joining together the wire and center conductor pin. Leaving the wire unsoldered will result is sporadic operation and can result in damage to the radio’s RF transmitter.
Screw the outer shell of the RF connector onto the body of the connector. Your PL-259 connector is assembled and ready to be attached to the connector on the rear of the Uniden radio.
As I mentioned in the antenna mount write-up, the antenna cable had been brought into the Jeep cab via the oval shaped rubber grommet located on the firewall above the gas pedal. I routed the coax cable under the dash and along the driver’s side kick plate where another wire bundle runs from the dash to the rear of the vehicle. Where the TJ’s roll bar attaches adjacent to the driver’s seat, I routed the coax cable up along the bar (under the zippered factory padding) and towards the center of the roof. I had to remove and then reattach some of my add-on roll bar padding but that wasn’t all that difficult (cable ties are a very handy thing indeed!).
Wilson Flex-3 Antenna Installation and Adjustment
I’m somewhat of a fan of the Wilson Flex antenna. I’ve been running their 4′ model for a couple of years and have had nothing but total satisfaction while doing so.
I was very pleased to see that Right Channel Radios included a Wilson Flex antenna in their off-road kit. I had my choice of a 3′ or 4′ model and chose the 3′ length. Why the shorter one? As I said, I’ve ran the 4′ for a couple of years and I wanted to see how well the 3′ model performed. Also, I can get my garage door up and down with the 3′ model.
To keep weight at a minimum, the antenna is built on a 1/4″ tapered fiberglass rod using 22 gauge silver plated wire and covered with a black polyolefin protective covering. Not only does this make for a light weight antenna but it makes for a great amount of flexibility. You should realize that no antenna is bulletproof and those used on the trail will certainly get more abuse than one spending its years going cross-country on a big rig. That being said, I’ve found that the more flexible the antenna is, the better survival odds it has. I’m not a big fan of antenna springs and appreciate the slim and trim appearance of the Wilson Flex antenna design.
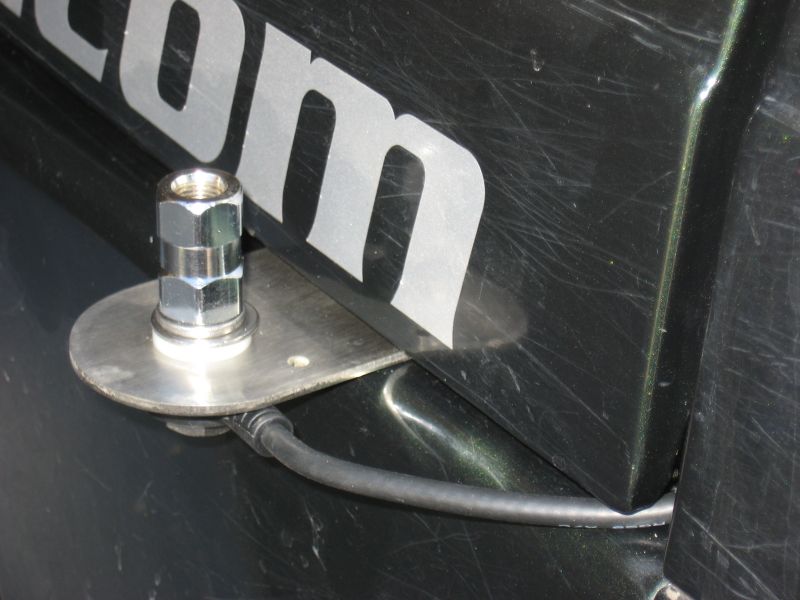
With the mount installed, it was time to attach the antenna to the mount.
The coupling nut is threaded at both ends and allows the Flex-3 antenna to thread directly into it. I used a pair of wrenches to gently snug the antenna into the amount.
The Flex-3 antenna comes with a “matching lead”, as shown in the above photo, that when attached to a ground, lowers the resonant frequency of the antenna. I’ve not found it necessary to use this wire and if you use it when not needed, your performance will suffer badly. On my Flex-4 antenna, I cut the connector from the end of the wire and then used a length of heat shrink tubing to secure the wire along the length of the antenna. This kept it out of site and also from touching any metal. Worked great! It also allowed me to maintain a functional matching lead should I ever change mounting configurations and find myself possibly needing it.
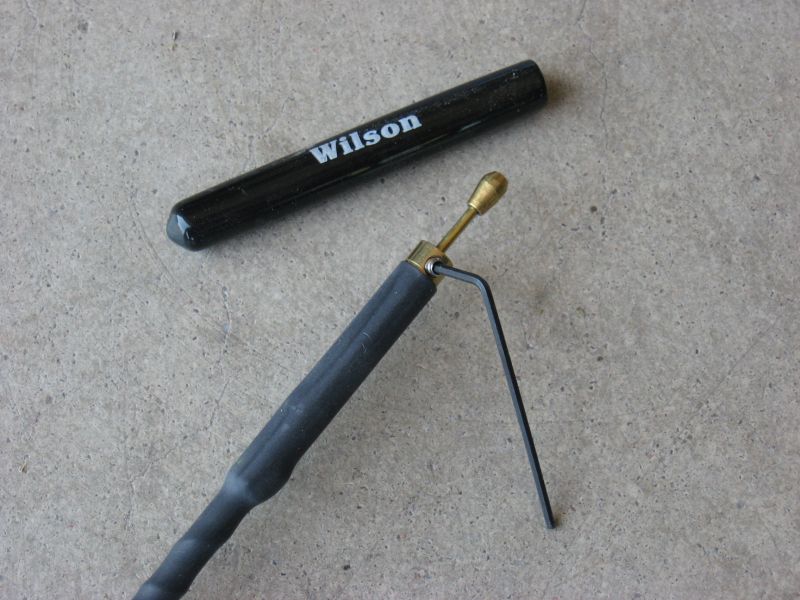
The Flex antenna has an adjustable tip that allows you to adjust the antenna for minimum SWR (stand wave ratio). A small Allen wrench is supplied (nice touch). My suggestion for the Allen wrench, after you are done using it, is to put it in a labeled envelope and toss it into your glove box for the next time you might need it. Just remember where you put it!
OK….Time to adjust the antenna using the SWR meter supplied in the off-road kit.
The fundamentals of adjusting the antenna are pretty simple. The goal is to get as low of a SWR as you can. A ratio of 1 to 1 is perfect. 2:1 is not too bad and one can certainly live with that. 3:1 is the max and I would do some serious work to get mine lower than that if at all possible. Anything higher than 3:1 means you have problems that require attention and you shouldn’t use the radio.
Check your SWR at Channel 1 and then again at Channel 40. If the SWR is high on Channel 1 and low on Channel 40, then antenna is too short and you need to lengthen the adjustable tip.
If the SWR is high on Channel 40 and low on Channel 1, then antenna is too long and you need to shorten the adjustable tip.
When adjusting the antenna tip, you should move it a very small amount, about 1/8″, and then check the SWR again. In most cases, a small amount of movement can change the SWR more than you might expect. Moving the tip in large increments may cause you to miss the “low spot” in the SWR curve leaving you with the appearance of something being wrong with your antenna.
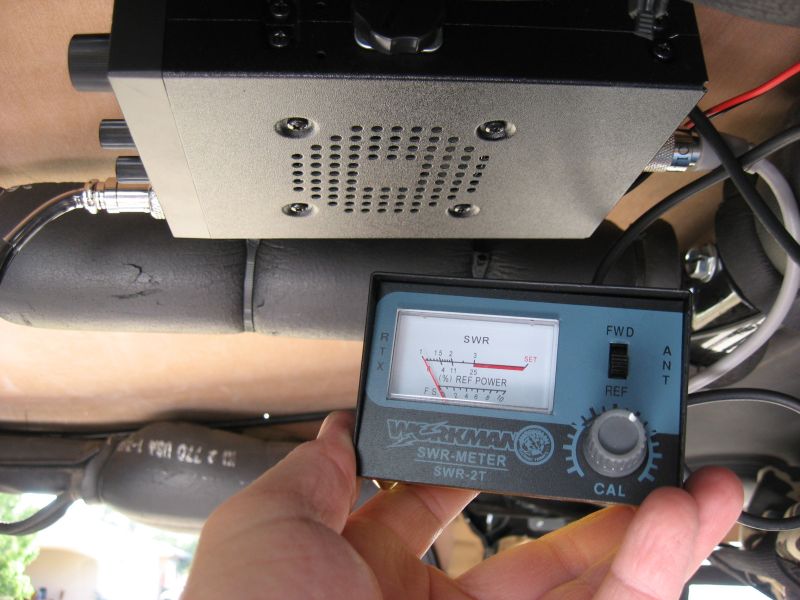
The SWR meter and 1′ patch cable is attached to the radio and to the antenna. The short patch cable is attached to the RF connector on the back panel of the CB radio while the other end of the patch cable is attached to the radio connector (labeled RTX) on the back of the SWR meter. The vehicle’s CB coax cable is attached to the remaining RF connector on the back of the SWR meter (labeled ANT).
To check the SWR, place the FWD/REF switch in the FWD (forward) position. Turn the channel control on the radio to the desired channel and push the push to talk (PTT) switch on the microphone. With the radio now in transmit mode, do not speak into the microphone. Keep the PTT switch pushed and adjust the CAL control on the front of the SWR meter such that the needle is aligned with the SET mark on the meter. With the PTT switch still pushed, change the switch to the REF (reflected) position and read your SWR on the top scale of the meter. A 1:1 SWR looks just as is shown in the above photo…..the red meter needle is resting on the “1” (far left end of the upper scale). A 3:1 SWR places the meter needle on the “3” mark at approximately the half scale position.
Every time you change the channel on the radio and check your SWR, be sure to place the switch in the FWD position and adjust the CAL control to the SET mark. Then move the switch to the REF position and read the SWR on the upper scale.
The SWR meter also indicates Percent of REFlected power. To read this, use the lower section of the upper scale. 25% reflected power is right at a 3:1 SWR.
Just a side note…..SWR meters are designed to work for a specific frequency range. This meter is accurate for those frequencies used by a CB radio. Use of the meter for other frequencies is not recommended as the accuracy is not guaranteed (or specified).
The Flex-3 adjusted very well. On Channel 1, I was able to get 1:1. On Channel 20, SWR as about 1.2:1 and at Channel 40, it was right at 1.4:1. Since the off-road community here in central Arizona uses Channel 4 as their default channel, I prefer the antenna be adjusted such that I have the lowest SWR on my most frequently used channel.
Uniden Off-Road CB Kit Performance Review
Here is where it all comes together and we see how well everything works as an off-road CB communication system.
The Uniden name has been around for quite some time and is prevalent in both commercial and consumer communications. The Pro 510XL is a good entry level radio in my opinion and might very well be all you’ll need for your off-road adventures. In the day and age where some manufacturers provide 1 year or sometimes just 90 day warrantees on electronics, you get a 2 year warranty on the 510XL.
The audio output from the 510XL is pretty good. The manual rates the speaker at 3 watts and unit is capable of 7 watts of audio output (there is an external speaker on the rear panel) so hearing it should not be a problem. The downward facing speaker is optimally located should you decide to mount the radio on the upper portion of your sports bar or roll cage (as I did).
Front panel controls include Volume/Power control, Squelch control, and ANL (Automatic Noise Limiter). Sometimes the ANL will help reduce (I did not say eliminate) vehicle generated RF interference. This usually comes at the price of loosing some of the desired signal as well. You can experiment with it (turning it on and off) to see if/when it works on different noises that you might encounter as you are driving. The Channel Indicator is easy to read and is changed via the Channel Selector control. The range of the Squelch control covers a useful operating range.
I’ve not had the TJ out on the highway for testing yet but I managed to spin through the channels while it sat in the driveway during the antenna adjustment.
I heard a good signal on Channel 6 and came back asking for a radio check. I received an excellent report and the guy I was copying was crystal clear and pegged out the meter. He told me I sound as though I were in his back seat. A quick check indicated he was a half mile away. OK, so it’s not a record breaker but it is an indication of what kind of performance I expect to see on the trail. Trail communications yielding solid copy at a half mile should keep anyone happy.
I’ll add more to this section as I get a chance to try the Uniden around town, on the highway, and on the trail.
For the time being, the Uniden Off-Road Kit has more than met my expectations for performance. The fact that the installation was clean and easy and the antenna adjustment was done in just a matter of minutes with excellent results was just more frosting on the cake, in my opinion.
I don’t see how anyone could be disappointed with this off-road kit for just $99.
Stop by Right Channel Radios online CB Radio and Antenna Shop for a large selection of radios, antennas and, of course, Jeep CB Kits.
Update: 4/28/2008
While running some errands today around town, I turned on the Uniden. Channel 19 showed some activity so I listened for a bit. Found a truck stop, about 5~6 miles away, giving out information on their local truck wash prices. In a couple of minutes, the same truck stop started chatting with a trucker that was more than 8 miles from my location. He was weaker than the truck stop but I could copy him without any problem as I drove down the street in my TJ.
The Uniden’s ANL takes the bite out of the static (sounds like ignition noise) without hurting the desired signal very much at all. So that is working better than I was expecting it to.
As far as audio punch, I had no problems hearing the conversations while I was running about 45 MPH in city traffic.