Note from Stu: A big thank you goes out to Jason. Since Jason couldn’t find a write-up on the site (I’ve been fortunate not to have any heater core issues on my TJ), he offered to share a write-up that he did after completing the heater core replacement in his ’01 TJ SE. The write-up should be close enough for other TJs such that you will certainly have a good idea as to what is required if you decide to undertake the project. Thanks again, Jason, for helping all of us!
And now Jason’s write-up…..
Introduction:
So I just bought a used Jeep Wrangler with a 30-day warranty from a small local dealer. Almost immediately after the 30 days, I began to smell antifreeze, had trouble defrosting, and was noticing tiny droplets of an oily substance on my passenger floor. The obvious diagnosis was a leaking heater core. Calls to local mechanics, dealers, and small repair businesses revealed estimates of $550 to $850 dollars. The part itself was about $75 but the job was extremely labor-intensive. The entire dash had to be removed, along with the entire heater / a/c housing assembly.
To save myself several hundred dollars, I decided to do the job myself. I went on the Internet and noted a few forums where people discussed heater core replacement, but I couldn’t find any detailed instructions. Wanting to share what I learned, I prepared this document. I did consult a manual by a well-known corporation (who shall remain nameless) but it was more-or-less a broad topic overview.
I hope you find this useful. Note that I am not a mechanic. I’m a desk jockey who can turn a wrench and is stubborn enough to figure stuff out. If I could do this job, chances are you can too.
Tools Needed/Recommended:
– Metric & Standard Socket Set with various extensions and socket depths.
– Metric & Standard wrenches
– Assorted nut drivers
– Torx-head Wrenches
– Channel-locks
– Phillips and Flat-Blade Screwdrivers
– Flashlight and/or Trouble Light
– Plastic Baggies
– Permanent Marker
Notes:
– I removed my upper and lower doors (I have half-doors) prior to beginning the job. I wanted to be able to get under the dash with the least amount of effort and contortion.
– I found it useful whenever I was removing bolts/nuts to put those parts in a baggie and label the baggie with the particular step I was on. That way I didn’t have to look at a huge pile of hardware and try to remember what went where.
– If you have a/c, it gets a little hairy since the refrigerant needs to be purged and the refrigerant lines need to be disconnected. If you are uncomfortable performing these steps and don’t have the necessary equipment to keep the EPA happy, you should leave this phase to the professionals.
– Plan on a full day for the entire procedure. Or if this isn’t your daily driver, do the job in phases over several days (steering column assembly, dash assembly, HVAC assembly)
The Job:
1. Disconnect and remove the battery. The negative cable needs to be disconnected to disable the air bags, anyway. It makes it a lot easier to get to the heater core hoses and housing-to-chassis nuts.
2. Drain the antifreeze from your radiator. Or, if you plan to have a professional radiator flush, you can skip this step.
3. Remove the entire steering wheel assembly, by performing the following:
– Remove the two (2) Phillips-head screws from the knee blocker and set the part aside.
– Remove the upper and lower trim pieces from around the steering column. This, too, is held by two (2) Phillips-head screws.
– Unplug all electrical connectors. Be sure to view the connector locks so as not to break any. Note that there are connectors at the top, bottom, and both sides.
– Remove the shift interlock cable (if so equipped) by turning the key to the “On” position and pressing the yellow tab. It will then slide out. Be sure to turn the key off and remove it so it doesn’t get broken.
– Remove the switch bundle where it is tethered to the top of the column and allow it to hang to the bottom right.
– Remove the pinch bolt (1) securing the upper and lower steering shafts using a 13mm socket. This is located close to where the shaft enters the interior compartment.
– Remove the two (2) nuts securing the steering column to the cross-member of the firewall using a 13mm socket.
– Remove the two (2) nuts securing the steering column to the top of the firewall using a 13mm socket.
– Holding the wheel, allow it to drop down and then pull the entire assembly toward you, being careful to guide the cross member so it does not bind with the studs from the firewall. Do NOT allow the steering wheel to spin within the column assembly as it will damage the clock spring which will then need to be replaced! If the clock spring is damaged, you see issues with your horn, air bag light and possibly the instrument cluster when you reassemble your dash.
– Once the wheel has been removed, your Jeep should resemble this:
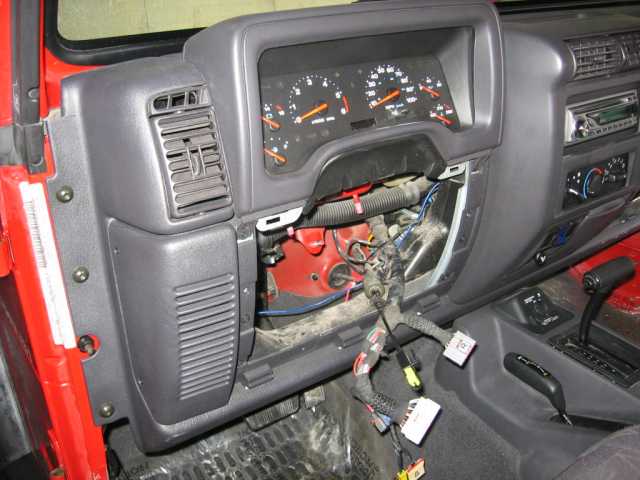
Figure # 1
4. Disconnect the wiring harness connectors from the 100-way wiring harness unit on the left side of the inner panel. You can access it through the hole where your steering wheel was, or from underneath the dash. I had the following connectors, viewed from top to bottom:
– Gray
– Green
– Red I
– Blue
– Yellow
– Black I
– Black II
– Red II
5. Disconnect the driver’s side defrost hose at the central duct, towards the middle by twisting and gently pulling.
6. Remove the glove box by removing the tether attached to the screw behind the right upper corner of the glove box. Once that is free, let the glove box tip down until it is free of its hinges.
7. Reaching into the cavity behind the former glove box, disconnect the following:
– Two halves of the heater / a/c vacuum harness connector. This has numerous yellow and blue hoses. As you disconnect it, you’ll hear the air pressure being relieved.
– Two halves of the radio antenna.
– Air bag wiring harness connector (green).
– Any other wiring harnesses you can see but I failed to mention.
– Passenger-side defrost hose at the central duct, towards the middle, by twisting and gently pulling.
– Remove the two (2) nuts from underneath the passenger’s side air bag using a 15mm socket.
8. Remove the upper cover from the dash. This runs the entire length of the dash and is about 3 inches wide. Gently pry one end up and work your way to the other side. This is held on with tabs, not screws.
9. Remove the three (3) Torx-head screws from each side of the dash using a T30 Torx-head wrench, where they attach to the door pillars.
10. Remove the four (4) nuts along the window where the dash is mounted using a 10mm socket.
11. If applicable, disconnect any custom switches you may have installed to the center console.
12. Straddling the middle console, lift the dash up and out, being careful that all lines/connectors have been removed. If needed, get some assistance when removing the dash.
13. The dash, removed as an entire unit, will look like this:
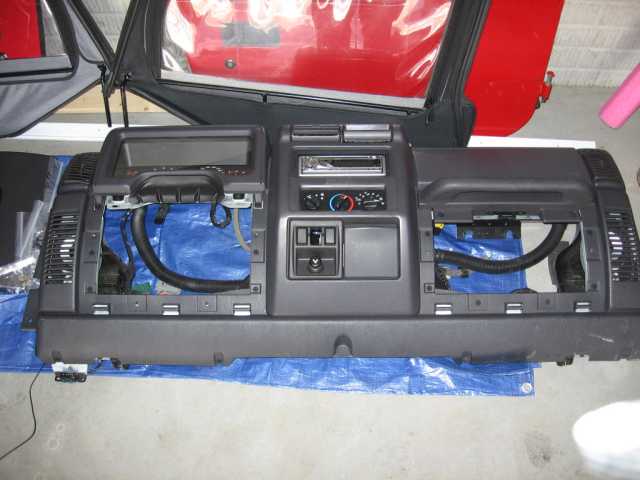
Figure #2
TJ Heater Core Replacement
for 2001 TJ 2.5L engine
14. Your Jeep, however, now looks like this:
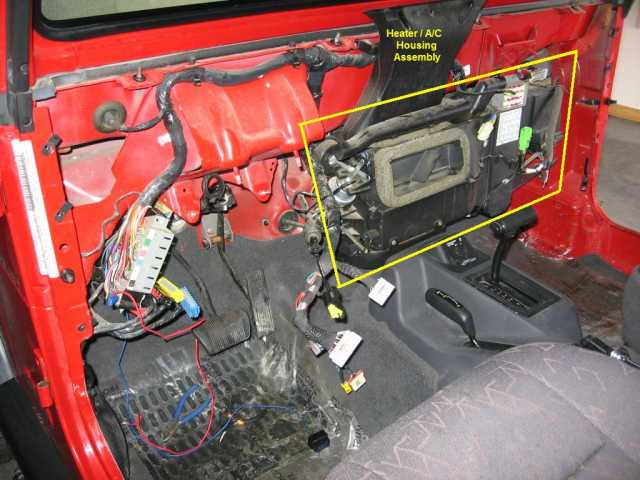
Figure # 3
15. If you have air conditioning, you need to discharge and recover the a/c refrigerant (i.e., “Freon”, although that specifically, is no longer used). You then need to disconnect your refrigerant lines from the evaporator. This is necessary since the entire heater / a/c housing assembly will be removed from your Jeep.
I’m really not going to detail this since the EPA has gone to great lengths to protect our ozone layer from this stuff.
Suffice to say that these steps would best be performed by a professional. [See Figure 4]
16. Disconnect both heater hoses from where they enter the interior cabin. Notice that the top hose is larger in size, while the lower one is smaller. Take note of the hose orientation. The two ends of the spring clamps may be squeezed using a channel-lock pliers. Note that you may need to twist the hose to loosen it up. A coating of warm, soapy water may also do the trick, although you should avoid getting this into any openings. [See Figure 4]
17. Disconnect the vacuum supply line connector. [See Figure # 4]
18. Remove the L-shaped evaporator drain tube that protrudes from underneath the evaporator canister.
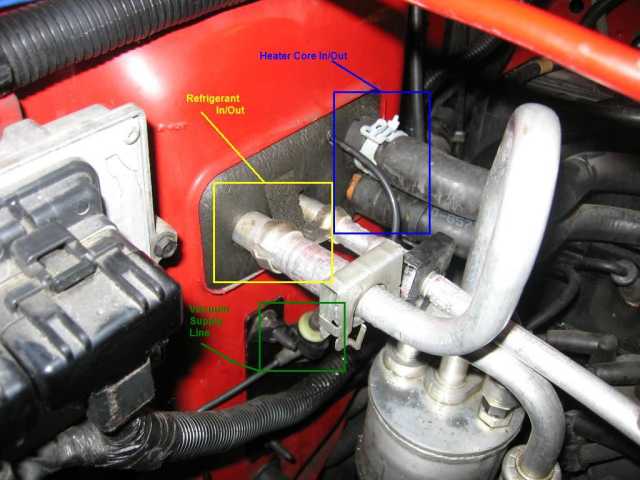
Figure # 4
19. Remove the five (5) HVAC housing-to-chassis nuts using a 7/16 socket or wrench. [See Figure 5] They are found (when viewing from the engine compartment):
– To the left and bottom of the blower fan (1)
– Holding the evaporator canister bracket (2)
– In the middle, above the engine (1)
– In the middle, just above the cylinder head. Note that this one holds the cowl plenum drain tube. The nut holding the drain tube must be removed, the cowl plenum drain removed, and then there is another nut underneath. (1)
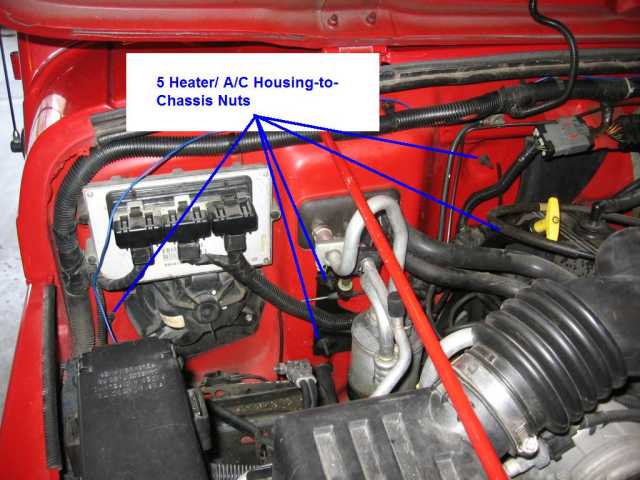
Figure # 5
20. From within the cabin, remove the floor duct from the bottom of the HVAC unit. This can be done by removing the two (2) front and one (1) rear screws with a 7/16 socket or wrench. The duct can then be slid to one side and removed.
21. Remove the screw holding the HVAC unit to the firewall bracket, near the fuse panel, using a 7/16 socket or wrench.
22. Straddling the center console, slide the entire HVAC housing toward you, being careful to clear the center air ducts. Remove the entire system and place in a suitable area where you will now begin the disassembly.
23. Using a 7/16 nut driver, remove all screws holding the upper and lower HVAC housing halves together. Gently remove the top cover of the unit. I’ll be honest; I had a lot of trouble here and had to gently pry the thing apart.
24. Remove the leaking heater core from the housing. When viewing the HVAC unit as it appeared in the cabin, the heater core runs across the back from the left side to the middle, where the tubes exit the housing.
25. If possible, clean the housing of any oil/antifreeze leftover from the formerly leaking core.
26. Replace the leaking core with the new unit.
27. Refit the upper and lower halves of the HVAC unit together and replace all screws.
28. Repeat all prior steps in the reverse order to reattach the unit, refit all hoses/lines, reassemble the dash, and reassemble the steering column.
29. Replace your coolant or have it flushed by a professional.
30. Crack open a cold one and give yourself some credit. Use the $500 you saved and treat your Jeep to some new goodies.
Update: 02/06/2010
Stu’s comments – I recently received an e-mail from MikeP, one of folks that use the site, regarding Jason’s heater core write-up. MikeP said:
Stu,
I’m about to re-assemble from Jason’s write-up of the TJ Heater core replacement project. I wanted to pass this along to you in case you wanted to append it onto the write-up. I followed his instructions but I have a 4.0 with a/c and had a couple of workarounds. By the way, that was probably the best write-up I have ever followed.
So with that being said, here are MikeP’s comments regarding the heater core write-up.
I don’t know how old the write up is but it was an excellent piece of work. I just followed it for my 01,Wrangler Sport TJ 4.0 and with a couple of exceptions, it went smooth as silk.
If you want to add the changes, here they are:
On the five firewall nuts, there is a sixth one stacked under the drain from the louvered air intake in the hood. It is lower nut on the firewall right behind the valve cover on the 4.0. It was just a surprise when the unit wouldn’t come out.
The third screw in the back of the floor duct was easily removed with a 5/16 brake bleeder wrench. Would be even easier with one of those ratchet-type box wrenches.
And lastly, my a/c was already discharged but I didn’t have a clue about the a/c line disconnects. After some Googling, I bought the plastic a/c discharge tools (6-pack of colored plastic rings) from Harbor Freight for 7.99. Worked like a charm! Tried the metal x type wrench first but it was just flat lousy. I also removed he defrost piece held by two clips in the firewall and the unit slid right out.
Thanks again!
Update: 11/01/2012
Stu’s comments – I recently received an e-mail from Kevin, one of folks that use the site, regarding Jason’s heater core write-up. Jason said the Harbor Freight wrenches he used didn’t fit, so he got a different set. He said:
I ended up with a NICE el cheapo set from O’Reilly’s. These are from LISLE CORPORATION and are item number 37000. They consist of 6 plastic disconnect tools, on a nice storage piece, all for the incredibly low price of $10.99. As soon as I got back from the store, I slipped them out of the package and in less than a minute had both lines disconnected. I also am using a trick from a friend of mine who told me to cover the ends with some plastic, and wrap rubber bands around them to seal the lines from any dirt or debris that might try to enter them.
Update: 03/10/2013
Stu’s comments – I received an e-mail from MikeB today who was writing to tell me he had just finished a heater core swap over the weekend. Thanks Mike for the feedback. Mike suggested I add the following to the write-up, so here it is.
I do have something to add… When my steering wheel was off, it spun on me and broke the clock spring. A warning that the steering wheel shouldn’t be allowed to spin while the column is off the vehicle might save the next guy.
Update: 03/11/2013
Stu’s comments – I received an e-mail from DavidH today who was writing to tell me he had just finished a heater core swap in his ’05 Rubicon. David was nice enough to provide a list of comments that he thought others might be able to make use of. They might have some Rubicon specific info in them. David said:
Here are a couple of notes from my install. Some may be a result of my Jeep being a Rubicon vs. the SE in the write-up.
1: There are a couple of ground wires screwed into the front side of the dash behind the speaker covers. You will need to remove the covers on both sides to see these grounds.
2: With the fully populated switch panel in the bottom of the dash I found it necessary to remove the center bezel, HVAC controls and Switch panel to disconnect the wiring harness. The bezel simply snaps in place with clips. The HVAC an switch panel are held in place with 2 screws each.
3: I also removed the gage cluster. The bezel is held in place with three screws along the top and two on the bottom. The cluster is held in place with 2 or 4 more screws. Once removed it is very easy to disconnect the harness.
4: It took me a bit to find it, but my Jeep had the elusive sixth A/C Housing-to-Chassis firewall nut. There are only 5 studs. The stud behind the valve cover has two nuts on it.
5: I had a heck of a time disconnecting the A/C lines. It was much easier after I decided to remove them from the evaporator and dryer also. Once the lines were loose at the opposite end, I could twist them on the disconnect to make it easier to remove them. With them off the vehicle I could also easily replace all the o-rings.
6: When taking the A/C housing apart to get to the heater core, there are a few foam gasket pieces that cross the seams. Very carefully remove these pieces without tearing them and when you reassemble the box, apply some spray adhesive to the gaskets to stick them back in place. I used Elmer’s craft adhesive. It is foam safe and if you allow it to dry for 30 seconds before you attach the parts it will make for a tacky temporary bond that will hold the pieces together until everything is reassembled.
7: This is just a tip: Rather than putting all the screws and nuts into little baggies, (I would surely loose a bag) after removing a component, I would replace the screw or nut on the hole/stud from where it came. During install everything was right where it belonged and I didn’t have to remember how many screw a certain component took.
Update: 07/06/2013
Another heater core swap write-up has been added to the site. Well worth taking the time to review if you intend on doing a replacement of your heater core.
Update: 07/06/2013
Stu’s comments – I recently received an e-mail from JamesF who was writing to tell me he had just finished a heater core swap in his ’00 Sahara TJ. James provide me with some information and asked that I add it to the site so others could benefit from it. James, thank you for the nice words…..always good to hear about a project that went well. Here are his comments:
Stu,
First off please let me thank you for your excellent resource for all TJ owners. Your encyclopedic collection of how-to’s has saved me, and no doubt countless others, thousands of dollars in mistakes and shop fees. Now, what I wanted to pass on to you…
I used your site and the linked other sites to change my heater core and A/C evaporator in my 2000 Sahara TJ. I took pictures of a method that I found mentioned in other sites, but not captured in the “how to’s”. If you find the time please add to your site:
1. I left the steering column in and did not remove the dash
2. Instead I followed the directions on your site, but when it came time to remove the dash I suspended it with para-cord from the ceiling.
3. As a first timer for changing out the heater core and evaporator it took me 2.5 hours to disassemble everything, and just under 6 hours to finish the job.
4. There were two “problem” spots that cost me at least 1.5 hours together; the 5/16’s screw on the bottom of the HVAC container, drivers side, on the bottom. If I had to do it again I would begin removal of the HVAC container before trying to remove this screw; how frustrating! I ended up NOT putting this bolt back in, no adverse side effects so far…
5. The second trouble spot were the 4th and 5th firewall nuts behind the valve cover. No easy way to remove these that I saw, but perhaps with a ratcheting wrench it would be faster.
6. I purchased both the heater core and evaporator from Pep-Boys; the heater core was the “Spectra Premium” brand (only one offered) and cost $71.49. The evaporator was “Factory Air by 4 Seasons” for $139.99. Both items matched the stock parts exactly, no issue installing at all. Recommend when doing this job to purchase some sticky-foam tape (insulation type) to affix around the core where the replacement part is missing what the stock part has.
7. I purchased the A/C line separators from Pep-Boys, they were the plastic, flat variety and worked great.
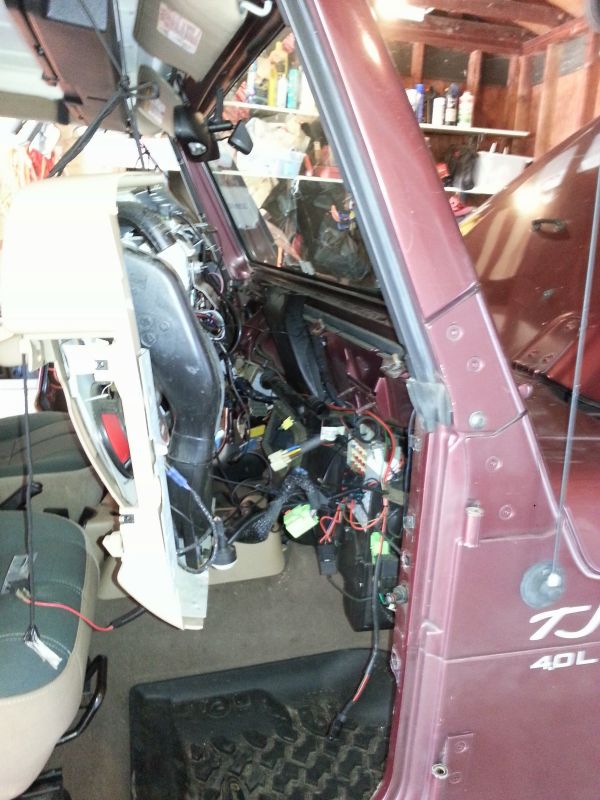
TJ dash suspended with paracord