A few days ago, I received an e-mail with a couple pics from MikeW, a very good friend of mine who regularly participates in wrenchin’ projects with me (sometimes on his stuff, sometimes on mine). The pics were of his leaking steering box on his 2000 TJ. He had decided he was going to replace it and so we exchanged e-mails as to what was available, pricing, etc. After some deliberation and a phone call to my friend in CA, Mike decided to go with a rebuilt box from the local auto parts store. It was decided that his wheelin’ probably doesn’t require one of the higher end steering boxes from PCS or Tommy Lee and the money saved could be applied to other things on the to-do list.
Mike stopped by the local auto parts store and picked up a rebuilt box for a TJ. They had no Grand Wagoneer boxes in stock (none of the stores did) and he didn’t feel like putting the wrenchin’ session off to another weekend while waiting for the special order box to arrive. He also picked up a Hayden tranny cooler that would be installed as a power steering cooler, as I had done. When I arrived the following morning, we took a quick trip to AutoZone to rent a pitman arm puller and pick up a bottle of Valvoline Synpower power steering fluid.
Update: I’ve since talked to MikeW in regards to the steering box. He said it was like driving a Cadillac. The slow degradation of the steering box (ultimately resulting in a leaking seal?) went unnoticed for the most part as other mods were installed, bigger tires added, etc. Mike said he is very satisfied with the outcome and once again enjoys the handling and steering of the vehicle.
Many TJs, including Mike’s, has a skid plate that protect the steering box from assaults by rocks and other nasty objects. This is not a factory item but rather an early modification that lots of folks install. If you have one, it needs to come off. most are held on with about 3 bolts.
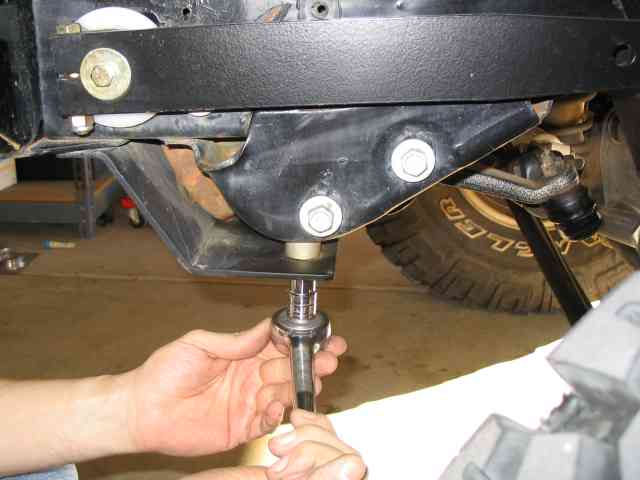
Mike has a Currie Anti-Rock swaybar on his TJ and removal of the driver’s side arm is required to gain access to the one of the steering box mounting bolts. If you don’t have an Anti-Rock, you have one less step to worry about. (but you really should get one!)
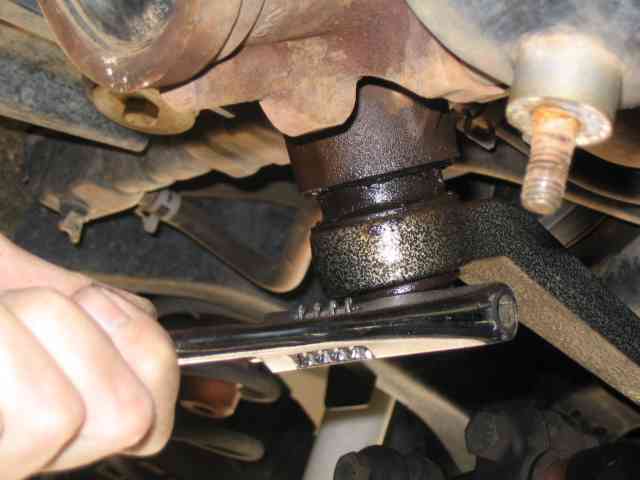
Next comes the pitman arm retaining nut. While I am not a adjustable wrench fan, Mike’s 1/2″ drive socket set stopped one size short of what was needed to remove the nut. So the adjustable wrench was put into use. The nut was pretty easy to remove (perhaps a result of the oil soaking into it) so we didn’t have to worry about rounding off the corners.
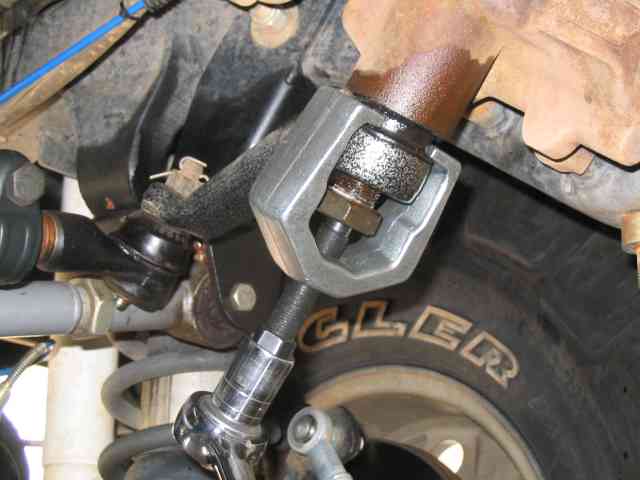
We left the retaining nut on the end of the shaft with about 4 threads engaged. When using a pitman arm puller, the arm can let go with a tremendous force. I’ve seen tie rod ends fly off quite violently when they were not properly retained. Leaving the nut on the end of the shaft helps ensure a safe removal. The pitman arm cooperated very nicely. We were ready to do some serious battle with it, armed with a fresh can of PB Blaster (penetrating solvent) and a hammer to tap on the side of the pitman arm while we slowly increased the pressure. Instead, it came off very easily. We discussed some of the horror stories I’ve read on the forums in regards to pitman arm removal by those Jeepers that live in the rust belt portion of the US (salty winter roads, etc.). I am grateful that for the most part, the Arizona weather doesn’t create those type of problems very often. Also be aware that the pitman arm pullers can break (especially those inexpensive ones from places like Harbor Freight). Be careful when performing this part of the job. Wearing eye protection is a good decision for all involved.
We opted to also separate the pitman arm from the drag link. Mike wanted to inspect the tapered hole in the arm and the Currie rod end as he had noticed a little play in them prior to starting the project. As it turned out, the rod end and pitman arm were both fine and simply needed to be torqued a bit tighter than they were.
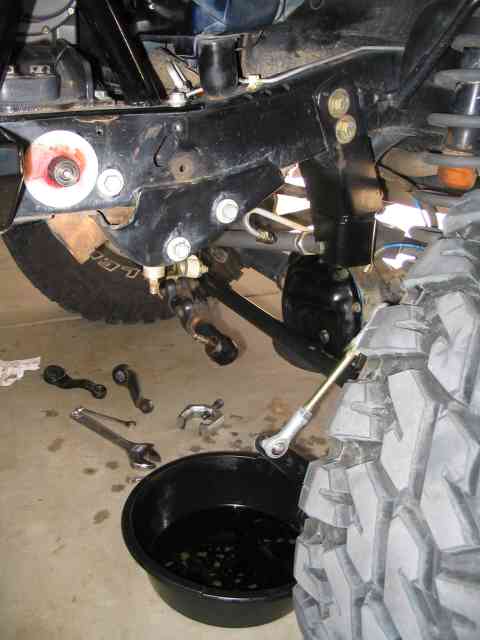
Be sure you have a catch container ready for the next step, else you will have a fair amount of power steering fluid to clean up once it is done draining from the pump and reservoir.
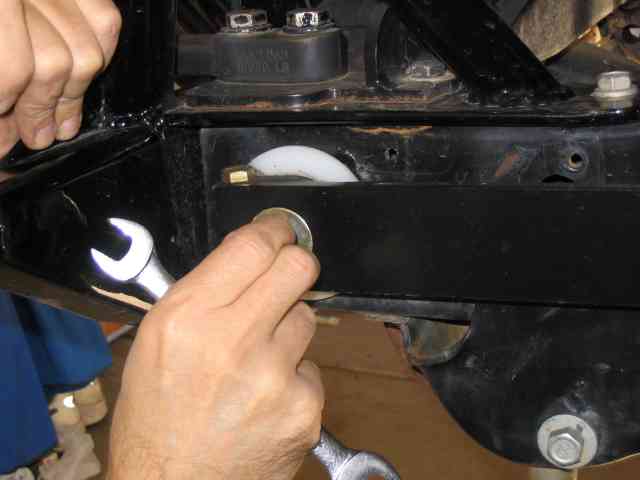
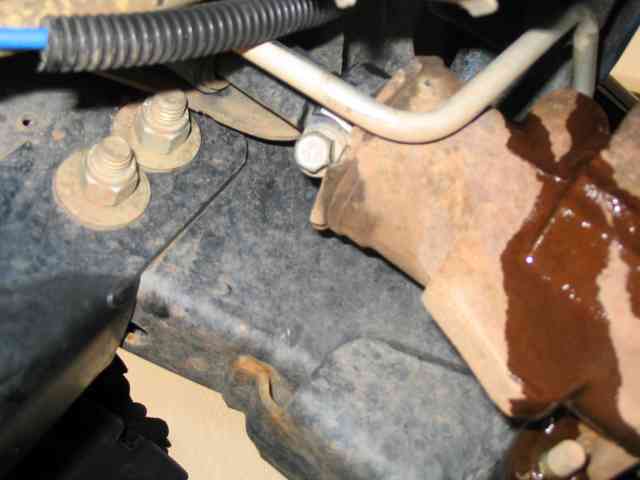
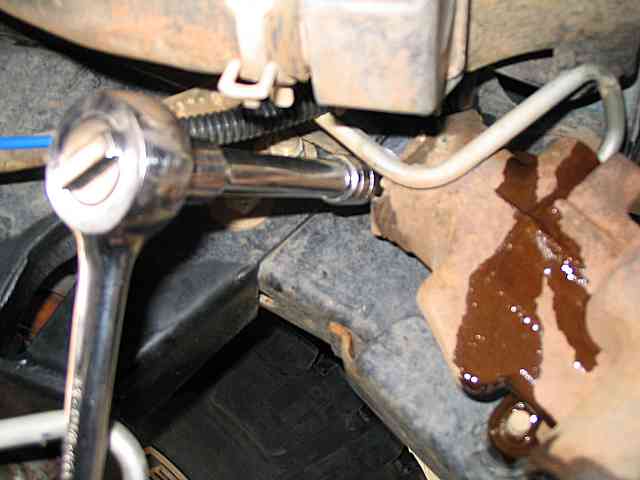
With the catch container in place, it was time to remove the high and low pressure lines from the steering box. These can be accessed from the top of the steering box, right under the front grill. If you have a winch installed, you will probably find it a tight fit but the lines can be removed with a little patience. An 18mm open end wrench was a good tool for this part of the job. When you get the lines free, you will find a generous amount of old power steering fluid coming out of them.
Steering Box Replacement
The steering column needs to be detached from the steering box. There is a splined coupler that is clamped tight with a bolt.
Remove the bolt from the coupler. You can not remove the coupler from the steering box shaft until the box is unbolted from the frame.
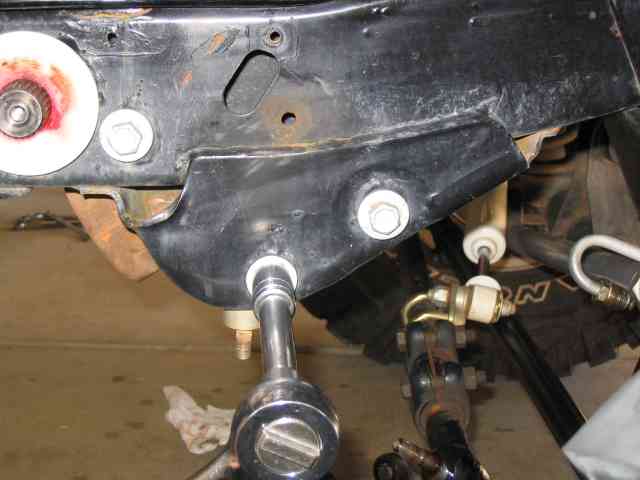
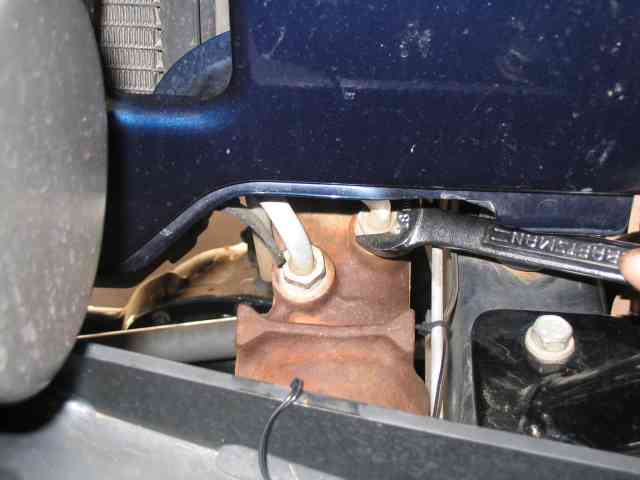
Now come the three mounting bolts. These secure the steering box to the frame mounted bracket. The steering box is a little heavier than some may expect. Be sure to properly support the box before you remove the last bolt. I believe a 13mm socket was used on these bolts.
Here is a better look at the steering column coupler. It slid off of the steering box shaft without no problem. The coupler is splined and could possibly become an issue for those living in the salty winter road territory. You can also slide a screwdriver blade into the slot on the coupler to gently pry it apart which should help break it free. We did this during reassembly as we had a tighter fit with the new box and needed a little help trying to get the coupler onto the new steering box shaft.
NOTE: DO NOT TURN THE STEERING WHEEL WITH THE COUPLER DISCONNECTED FROM THE STEERING BOX. SOME FOLKS HAVE STUPID FRIENDS WHO FIND IT FUN TO SPIN THE STEERING WHEEL. DOING SO WILL BREAK THE CLOCK SPRING IN THE STEERING COLUMN. THIS IS THE DEVICE THAT PROVIDES THE ELECTRICAL CONNECTIONS TO THE AIR BAG, CRUISE CONTROL BUTTONS, AND THE HORN. DON’T BE STUPID, LEAVE THE STEERING WHEEL ALONE!
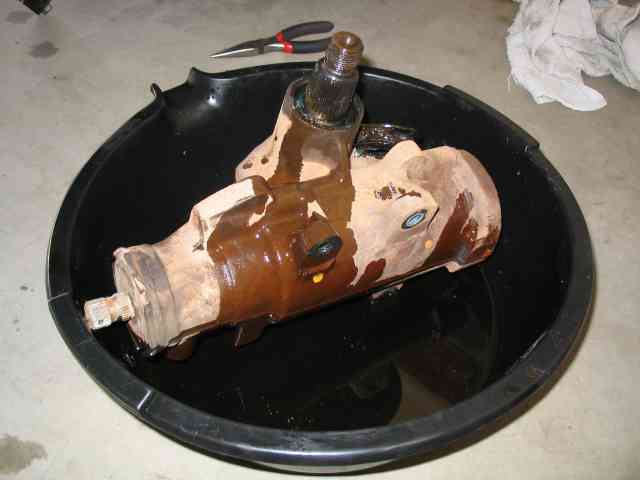
The old steering box was set in the catch container as it insisted on dribbling power steering fluid.
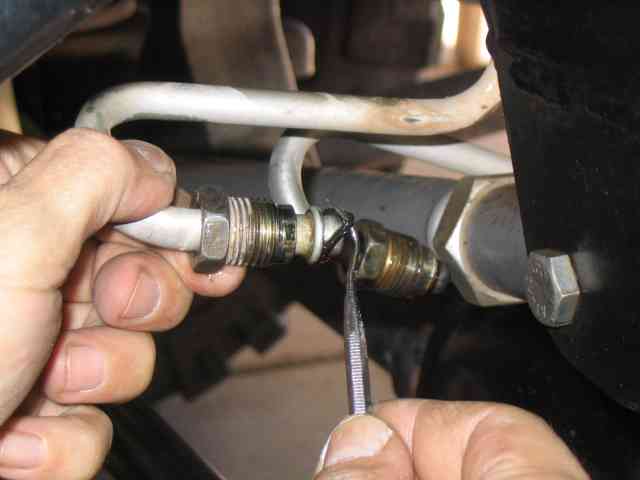
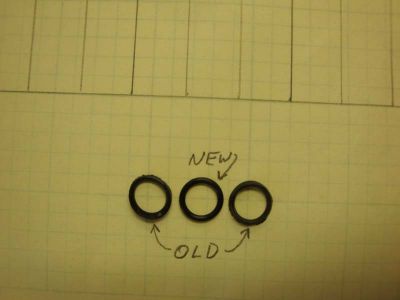
The high and low pressure line fittings have small o-rings on them that help seal them when screwed into the steering box. The rebuilt steering box came with a pair of replacement o-rings. Mike used a small dental pick to remove the old o-ring from the fitting. The new o-rings were coated with power steering fluid and slipped into position for reassembly.
Update: I recently exchanged several e-mails with a fellow Jeeper, Brad, who indicated his steering box didn’t arrive with new o-rings. Not wanting to recycle the old rings, he contacted me to see if I had a part number or dimension I could pass along. It seems that Jeep does not stock just the o-rings as a part one can order.
The McMaster-Car part # is 9262K445. Note that this will get you 100 o-rings for about $13 + shipping. You may want to take the below dimensions and see if you can find them locally for less.
Here is the info Brad passed along:
The closest thing I could find was 8mm ID and 1.5mm thick from McMaster Carr.
BUNA-N material seems to be the way to go for power steering fluid, petroleum based hydraulic fluid, etc.
I assume the o-rings are metric since the ftg is 18mm, but who knows? I’ve had the new orings on there for a couple of weeks now with no leaks, so I guess they are good to go.
I believe 5/16″ X 1/6″ might also work, but didn’t try them.
A big thanks goes out to Brad for sharing this information!
At this point, it is time to reassemble everything and get the system filled with some fresh power steering fluid.
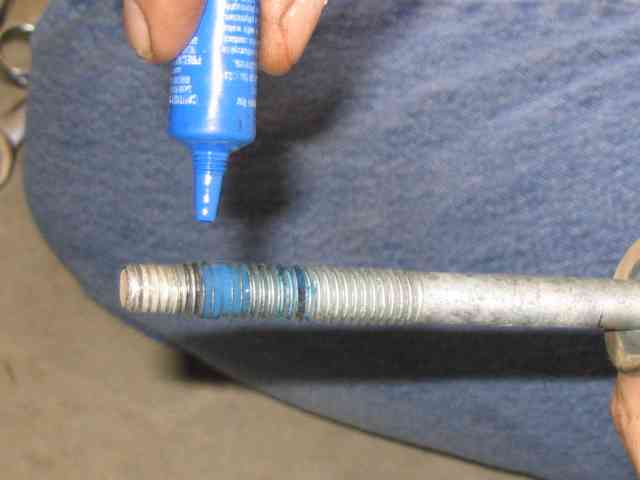
Mike used some blue thread locker on the steering box mounting bolts. The bolts are torqued to 70 ft. lbs.
Before the bolts are inserted, you need to slip the steering column coupler onto the steering box shaft. This was best performed as a two man job. I laid on my back and held the steering box up in position while Mike sipped the coupler on to the steering box shaft. The steering box shaft and coupler are keyed to ensure they are correctly aligned when connected. Once the coupler was one the shaft, Mike slipped a couple of the mounting bots though the frame bracket and into the box. He then applied thread locker to each bolt and torqued them to spec.
Next was the high and low pressure lines and this is where we hit a snag. To make a long story short, the threads in the low pressure port were messed up. Not wanting to risk the fitting on the low pressure line, we unbolted everything and took the steering box back for an exchange (Murphy finally strikes!). The store was out but another could be had at a store about 10 minutes further down the road.
We caught lunch and headed back to Mike’s place to wrap this up. This time, we checked the threads with a test hook up of the hoses. All was good. The coupler was attached and the steering box was once again bolted to the frame bracket. The hoses were attached and specs say they are tightened to just 21 ft. lbs. I saw virtually no way to get a torque wrench in that little space so we did a small grunt on the wrench and called it good.
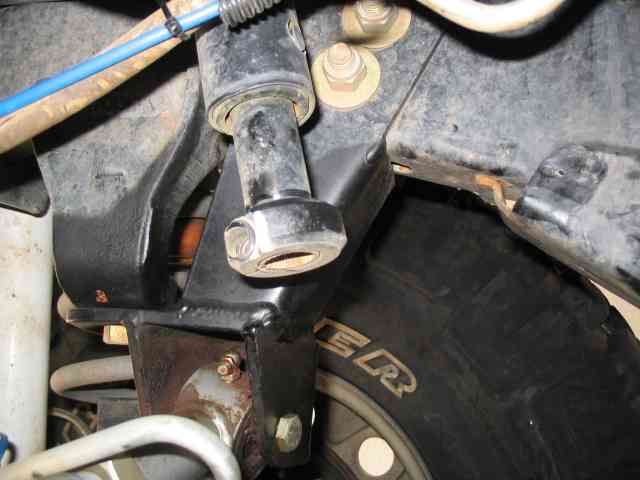
The pitman arm was next. It too is keyed to ensure a proper alignment when slid onto the pitman shaft. The retaining nut is torqued to 185 ft. lbs. That is several grunts more than the little grunt used on the power steering hoses.
After the pitman arm was attached, we turned our attention to getting some fluid into the system. I grabbed a floor jack and slipped it under the front differential. I raised the jack just enough to lift the driver’s side tire off of the garage floor. With the wheel lifted, Mike poured Valvoline Synpower power steering fluid into the power steering pump reservoir. After it was filled, I slowly turned the steering wheel from stop to stop (emphasis on slowly….taking about 8~10 seconds to complete one revolution of the steering wheel). Even from the driver’s seat, I could hear the bubbles gurgling in the reservoir. Every 30 seconds or so, Mike would stop me and he would fill the reservoir again. Bleeding the air out of the power steering system before starting the engine is a must do job. After about 3 or 4 minutes, the gurgling had all but stopped and fluid level was remaining constant in the reservoir.
Mike installed the cap on the power steering reservoir. I started the engine and let it idle for a few seconds. Turning the steering wheel from stop to stop, several times, we listened for the growling noise the pump will usually make if there is air in the system. All sounded normal. I killed the engine and Mike checked the fluid level in the reservoir. It had not dropped, which meant we had done a good job on bleeding the system. It took a full quart of power steering fluid to fill the system. I’ve no idea if there was any residual fluid in the steering box or not (one would hope the re-builder had tested the unit before boxing it up for shipment to the auto parts store).
That was it. The jack was lowered, the hood closed, and cleanup commenced. A straight forward project and can easily be accomplished in part of a day assuming you don’t have to make too many trip back and forth to the auto parts store (and your pitman arm is in a cooperative mood).
Good trails and remember to TREAD Lightly!