I never looked forward to working on the lower control arms of my TJ because putting the arms back in place was always a struggle. The brackets, at least mine, are always tight when I try to slide the RE cartridge joint into place. One day, while doing some control arm work at Scott’s place, he described a neat little trick he had used on his RE arms. I decided to give it a try the next time I had to replace my arms. While you may not struggle with you brackets, you have to remember that mine have been boxed in with heavy plate so they are not as easy to bend/spread as stock brackets.
With the 3rd Annual JeepsUnlimited Moab Run just a week away, I wanted to put my pair of RE adjustable lower control arms, that had recently had the bushings replaced, in the TJ. I had been running my spare set of RE fixed length arms since discovering the bushings in the adjustable arms needed some attention. I stopped by the local hardware store to get some 9/16″ grade 8 threaded rod. I was disappointed to find no 9/16″ rod but did locate a two foot section of 1/2″ fine thread. However, the bin of 1/2″ fine thread grade 8 nuts was empty so I opted to purchase some 1/2″ coarse threaded rod (which was not Grade 8).

So, with the 1/2″-13 threaded rod and a couple of Grade 8 nuts and washers, I decided to give Scott’s suggestion a try. With change back from my $5 bill, I headed for home to change out the control arms.
I cut off a piece of the threaded rod, grabbed my tools, and slid under the TJ. I removed the 9/16″ Grade 8 bolts from each end of the control arm and slipped the arm out from the brackets (using some gentle tapping from a brass hammer).
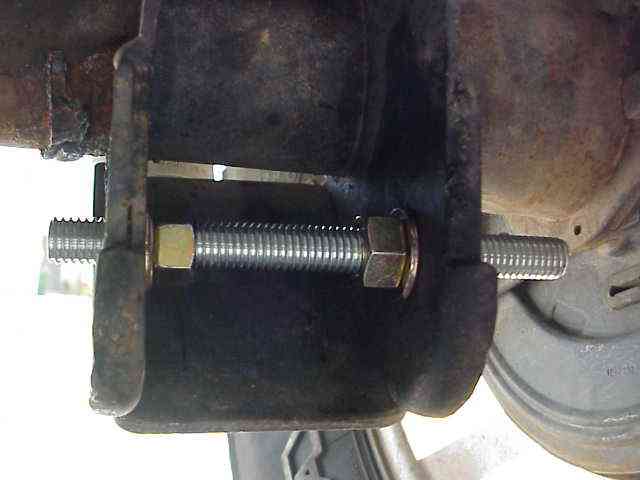
The above photo shows the new “bracket spreader” in position. As the nuts are tightened out against the washers, the bracket is gently spread open. I didn’t crank on it too hard, probably a couple of threads worth once the washers were tight against the inside of the bracket.
I then removed the bracket spreader and slipped the cartridge joint end of the RE arm into the bracket. It went in nice and easy….so much better than the old method of tapping with the hammer and a screwdriver (or what ever else was around) and using a punch to try to line up the bolt holes in the bracket with the cartridge joint.
Scott, thanks for a simple idea that works great! I tossed the bracket spreader into my tool bag so I’ll always have it handy!
Note: You will need to use 3/8″ rod to do the upper control arm brackets since they use smaller bolts.