In September ’99, I decided it was time to lift the TJ just a bit and give it some more clearance. My latest desert trek had convinced me that a few more inches would be helpful. Going in and out of the desert washes showed me that my approach and departure angles needed some improvement.
Having spent a few months reading the postings in one of the newsgroups, I decided to try the TeraFlex 2″ lift. I had read numerous comments about it and had found no negative postings about the lift or the company.
I ordered the kit from a dealer in Oklahoma (Supplee 4WD), after trying to find a local supplier in the Phoenix area. I ordered the kit on the Friday before Labor Day and it arrived the following Wednesday, dropped shipped from Tera Manufacturing in Utah. I did a quick inventory and everything appeared to be there. Aside from the 2T lift kit, I had ordered new shocks (your old ones won’t be long enough), the swaybar Quick Disconnect (QD) kit, and a transfer case lowering kit.
While I was waiting for the kit to arrive, I searched the web looking for any other information on the lift kit. I found an article posted on the Trail Quest web site. I would come to find that these few pages of first hand experience would come in very handy while I did my installation.
First off, let me state that the quality of the parts seem to be good. Time will tell as I put mileage on the springs, QD links, etc. What I found to be a major shortcoming in this kit was the directions. I am not a mechanic and have never claimed to be. However, 18 years of Midwestern farm life gave me a pretty wide exposure to machinery and the maintenance of it. During the late 70’s, I also did some motorcycle grand prix road racing. I maintained my own bike, which included frame mods and engine rebuilds. I’ve never installed a suspension lift kit. The instructions provided with my lift kit confirmed that I knew little about suspension lifts and that it was NOT going to be of much help in my gaining any insight into doing them.
I contacted Tera and expressed my negative feelings concerning the documentation. This was the reply they sent me. I do hope that they will indeed improve the quality of their install documentation.
From: Mark Falkner [[email protected]]
Sent: Monday, September 13, 1999 8:03 AM
To: [email protected]
Subject: From TeraFlexStu,
Thanks for the detailed suggestions on our 2T instructions. I apologize for the frustration we caused you. Our other instructions are much better. We are in the process of making new instructions for the 2T. The 2T was developed and targeted to Jeep dealers so the instructions were a secondary concern. I can not remember anyone giving us any feed back on them. So when someone does take the time to give us their insights we really do appreciate it.
Sincerely
Mark Falkner
Tera Mfg.
January 31, 2000 NOTE: On January 15, 2000, I received some information from Tera (I had requested some info on two other products) and included in it was their recently updated 2T installation instructions. They did an outstanding job on the new installation instructions. My compliments to them for their follow-up with me and the nice job they did on their instructions. New owners should be very happy with what they receive in their 2T kit.
I will also comment that the lift has seen some hard use since the Sept. 1999 installation. It does a very good job on the trail. The sway bar disconnects are easy to use and remain just as tight and rattle free as the day I put them on (you can’t say that about several of the other brands available). My friends continue to comment about the incredible amount of wheel articulation and the fact that I rarely ever lift a wheel on the trail. I recommend this lift to anyone interested in an affordable lift for their vehicle. You won’t be stuffing 33″ tires with this lift, but it does my 32″ BFGs and gives the Jeep a great overall look.
With the help of the information I gathered form the web and that of two good friends, we tackled the lift kit installation. My comments below are not intended to replace those that come with the lift kit. These steps are a compilation of those from the lift kit instructions, those I found on the web, and our own trial and error attempts. As always, the usual disclaimers apply here….I am not responsible for your actions….use at your own risk…..and your mileage will certainly vary. One thing that I will stress, however, is SAFETY. Please remember at all times that you are working in and around a 3500 lb. vehicle. Chock your wheels, set the parking brake, use good quality jack stands that are designed for the load, and use a good quality jack for lifting. Above everything else, think SAFE.
Tools used:
Metric and standard sockets and wrenches
Torx bits (up to T55)
Drill and index
Tap and die set
Floor jack
Jack stands (tall ones for 4×4 vehicles)
Coil spring compressor
The information I got from the web stated that “there is no danger of the spring flying out on a TJ and no need of renting a spring compressor”. I agree with that statement 100% as far as the rear springs are concerned. However, if you wish to install the taller springs up front, we found that we needed something to compress the springs. We ended up using 3 pry bars and 2 people to do the trick (not suggested). Had I known it was going to be like that, I would have gotten a spring compressor for the day.
Chock the front tires securely. Jack up the rear of the Jeep. Set the brake. Put the jackstands under the frame members. Leave the jack under the axle as you will be using it to lower and raise the rear axle. I found this most helpful when trying to remove or insert bolts in various holes, etc. By being able to raise or lower the axle, you can easily align the bolt or relieve the stress on it that is causing it to bind and not release easily.
Rear end installation:
- Remove the rear tires, the shocks, and the rear swaybar links. Save the shock and link mounting hardware for later use.
- Remove the rubber bumpstops. These are located at the top of each coil spring. Reach through the spring and wiggle the rubber bumpstop from side to side while pulling down. It will pop out of the bumpstop cup. Keep the bumpstops as you will be using installing them later.
- Using a 15mm socket, remove the bolt that is inside both of the the bumpstop cups. Keep the bumpstop cups. New bolts are supplied in the kit.
- Remove the rear springs. These will be replaced by the shorter pair of springs in the lift kit.
- Using a new bolt (50mm x 10mm 1.5 pitch) from the kit, insert the bolt into the bumpstop cup. Next, place one of the four bumpstop spacers (1.5″ dia x 1″ tall) on the bolt. Screw the bolt into the bumpstop pedestal using a 16mm socket. Do not install the rubber bumpstops yet.
- Remove the plastic dust shield that covers the bolt that secures the rear trackbar to the rear axle housing. (Don’t worry about destroying the plastic fasteners, as they are not used again.) This bolt is located on the trackbar mounting bracket located midway between the rear differential and the driver side brake drum, on top of the axle. The dust shield is not used again.
- Remove the Torx headed bolt that was beneath the dust shield. Keep the bolt and nut for later use. Tie the trackbar up and out of the way with some wire, twine, an old shoe lace, etc.
- Place the new rear trackbar bracket extension over the axle bracket. Note that the tabs will pretty much line up with the holes from the plastic fasteners. These holes will be drilled out in a couple of steps.
- Take one of the 3″ x .5″ bolts from the kit, and insert it partially into the trackbar bracket hole. Place the bracket spacer (1.5″ long x 1″ OD) inside the bracket and push the bolt through the spacer and out the other side of the bracket. The spacer fills the spot that had been occupied by the end of the trackbar and prevents the bracket from being crushed when the bolt is tightened. Tighten the bolt. This will now hold the bracket in the proper position so you can drill the holes in the next step.
- Using a 5/16″ drill bit, drill out the two small holes on the extension bracket. One of these is directly on top and the other is located on the lower part of the bracket. The holes you drill will not necessarily line up perfectly with the holes that had the plastic fasteners in them, but it will be close.
- Install the 1″ x 5/16″ bolts, washers, and nuts in the holes that were just drilled. Tighten the nuts. The trackbar bracket extension is now secured at three points.
- Untie the trackbar and lower it into the extension bracket. Line up the end of the trackbar with the large holes in the extension bracket. Secure the trackbar using the Torx bolt and the nut you removed when taking the trackbar off.
- Install the 6.5″ diameter rear springs. Be sure to slip the rubber bumpstop into the inside of the spring as you are sliding the spring into place.
- Push the rubber bumpstop securely up into the bumpstop cup.
- Install the shocks, piston end up, using the hardware from the old shocks.
- Install the swaybar links using the old hardware.
- Remove the jackstands and lower the Jeep onto the ground.
Front end installation:
Using the jack and jack stands, jack up the front of the vehicle. You may wish to keep the jack under the axle for easier positioning as was mentioned in the above steps.
- Remove the tires and shocks. Retain the mounting hardware from the lower end of the shock. Your shocks should have come with new hardware for mounting the top of the shock.
- The front shocks contain a slotted fastener (bolt?) that connects the bottom of the shock to the shock mount. The new Doetsch Tech shocks that I ordered with the kit do not include these fasteners. The ones in the OEM shocks appear to be either expoxied or vulcanized to the shock bushing. You can either buy new ones at the dealer/autoparts store, or you can salvage the old ones. We found that our procedure made reclamation of old shock bolts for reuse on new shocks a breeze; the entire process took less than five minutes per shock.
- Remove the rubber bumpstops. These are located at the top of each coil spring. Reach through the spring and wiggle the rubber bumpstop from side to side while pulling down. It will pop out of the bumpstop cup. Keep the bumpstops as you will be using them later.
- Using a 15mm socket, remove the bolt that is inside both of the the bumpstop cups. Keep the bumpstop cups. New bolts are supplied in the kit.
- Disconnect the lower end of the swaybar link, which allows the axle to drop further.
- Remove the spring clips, which hold the bottom of the coil spring onto the spring pedestal.
- Remove the passenger side front spring, then the driver’s side spring.
- Using a new bolt (50mm x 10mm 1.5 pitch) from the kit, insert the bolt into the bumpstop cup. Next, place one of the two remaining bumpstop spacers (1.5″ dia x 1″ tall) on the bolt. Screw the bolt into the bumpstop pedestal using a 16mm socket. Do not install the rubber bumpstops yet.
- Using the spring compressor, install the passenger side front spring. While doing so, slip the rubber bumpstop inside the spring before you have fully positioned the spring. Ensure the bottom spring coil is rotated so the bottom butts up against the stop in the spring pedestal., then replace the spring clip, securing the spring to the pad on which it is sitting.
- Push the rubber bumpstop securely up into the bumpstop cup.
- Install the shocks, piston end up, using the hardware that was removed.
- Reconnect the sway bar links. If you purchased new quick disconnect links, install them at this time.
- The front end installation is now complete.
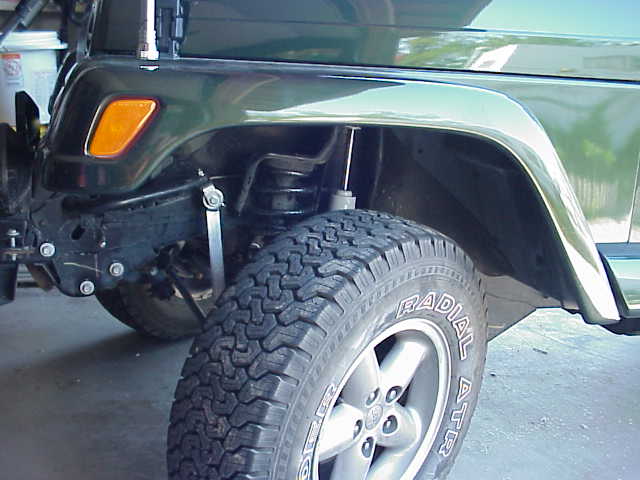
Here you can see the new shock, spring, and swaybar quick disconnect.
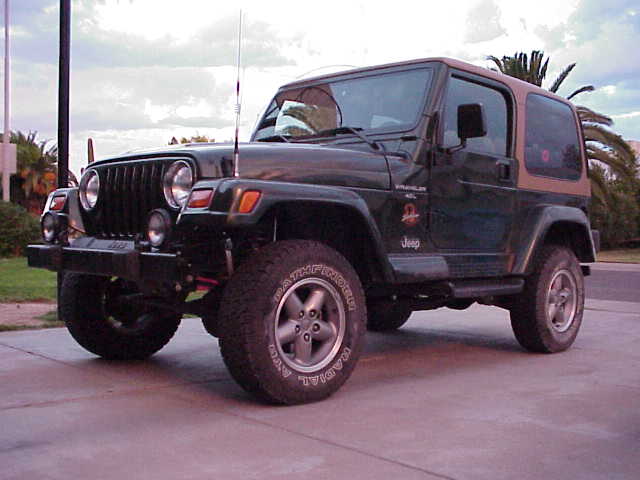
Click here if you want to see some pictures of the TJ after all of the work was completed.
Shock mount hardware reclamation procedure:
- Press old shock bolt out of the shock using a sturdy bench vise or hydraulic press. (We used a 6 inch bench vise.)
- Clamp the bolt in the vise, and make 4 lengthwise cuts in rubber bushing with a sharp box knife.
- While heating the bolt with a torch, pull the rubber quarters off with pliers. (We used a MAP gas torch, but propane or acetylene would work just fine.)
- Clean and polish the bolt with motorized wire wheel.
- Press bolt into new shock with vise or press. (A bit of WD-40 helps it slide into place.)
’98 Jeep TJ Sahara w/ TeraFlex 2T 2″ Suspension Lift
September, 1999
For the folks that were asking about my tires, I am still running my 30″ x 9.5″ on the 15″ x 7″ Grizzly wheels. When these wear out, I’ll probably go a bit bigger. What I would really like to do is re-gear and go to 33″ tires. That is probably a bit down the road (that was what I said a couple months ago about the lift!)
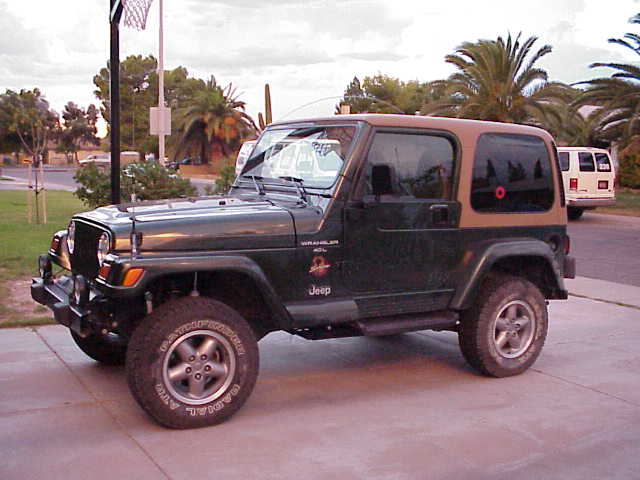
February, 2000
Five months ago, I said I would be running those 30″ tires until they wore out and then put on something bigger. I also wanted to regear and go to 33″ tires. Well, this month, I regreared to 4.56 and installed a Detroit TrueTrac up front and a Detroit Locker in a brand new D44 rear axle. Oh yeah, I got 32″ tires on new rims too. Well, that is how the Jeep thing goes……Just Empty Every Pocket.